Pages

Monday, June 24, 2019

Deco Foil Birthday Cards

I like that I am usually able to get two cards made when I use foil.  The left over is usable!  These two cards are a sample of this:


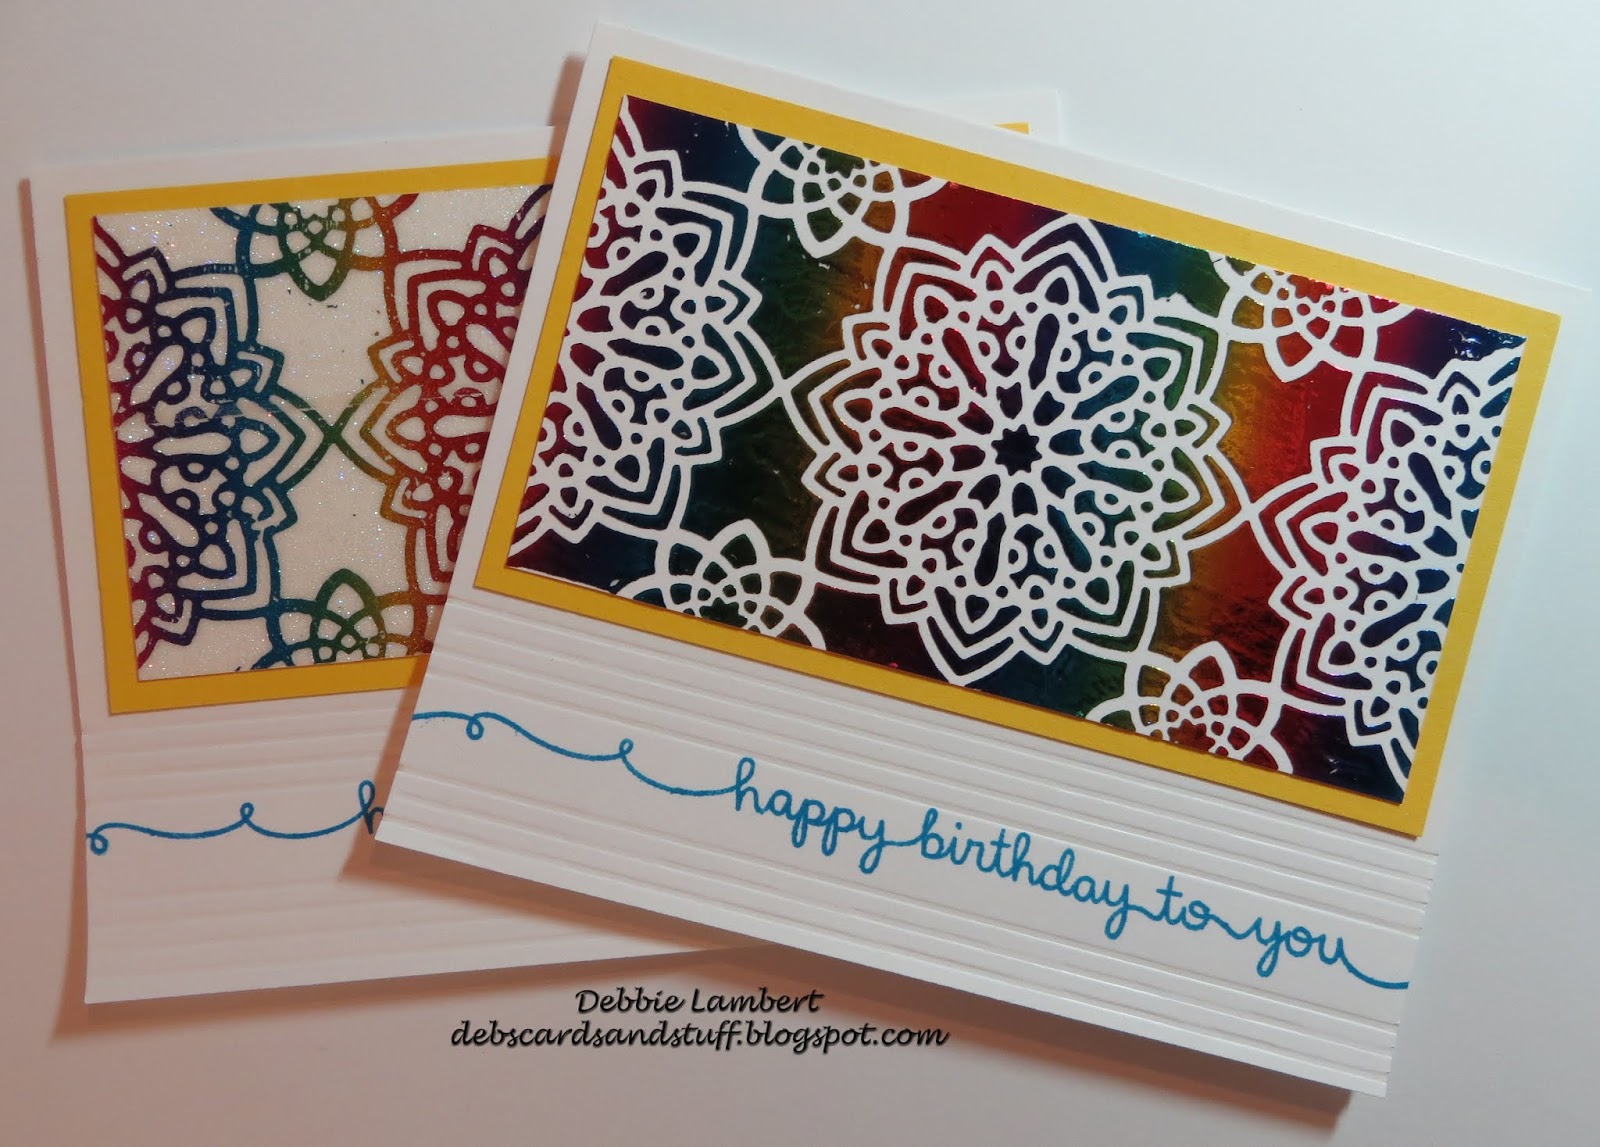
I used the following to make the cards:

  • Deco Foil Transfer Gel
  • Deco Foil - Rainbow
  • A Colorful Life - Medallions Stencil
  • Sookwang Double Sided Tape
  • Lawn Fawn Scripty Sayings Stamp set
  • Gina K Blue Raspberry Ink
  • Elizabeth Craft Designs  - Cool Diamond Microfine Glitter
For the first card (the one in the front in the picture), the stencil was placed on the card stock, masked to the specific area of the stencil to be used, and the Transfer Gel applied.  The stencil was removed, and once the gel was dry, the foil was added using a Minc machine (any laminator would work).  The panel was trimmed to size, matted with yellow card stock, and added to the card base.  Straight lines were embossed below the panel and the sentiment added to complete the card.

For the second card, Sookwang tape was added to a piece of white card stock.  The left over piece of foil was added to the card stock panel, and I removed the foil backing, exposing the tape in the areas where there was no foil.  Glitter was added and burnished in.  This was then matted with yellow card stock, and added to the card base.  Straight lines were embossed below the panel and the sentiment added to complete the card.

Wednesday, June 19, 2019

Jigsaw Puzzle Bithday Card

So, my grandson loves puzzles, the harder the better!  When I saw the Impression Obsession Puzzle Background die, I knew I needed it for his birthday card.  Of course, I only started the puzzle, and left the remainder for him to complete!


To make this card, I used the following:

  • Impression Obsession Puzzle Background Die
  • Mama Elephant Make a Wish Stamp set
  • Stampendous Detail White Embossing Powder
  • Versamark
  • Glossy Paper
  • Ranger Alcohol Inks
To make the card, I used a background I had made several years ago, using glossy paper and alcohol inks.  I heat embossed the sentiment on the background.  This was then cut using the puzzle die.  I also embossed the die on the front of the card, as a guide for the puzzle.  To start the puzzle, I permanently attached several pieces.  The remaining puzzle pieces were run through an Xyron, with repositionable tape.  These will be mailed with the card.  

Monday, June 17, 2019

A Tool Wreath for Fathers Day

So, I like using the Wreath Builder system from Gina K, and I needed Fathers Day Cards.  I found some tool stamps that worked perfectly to build a Tool Wreath!

For the card, I used the following:

  • Gina K Wreath Builder (3.75" template)
  • Gina K Black Amalgam Ink
  • Hero Arts - Fathers Day Stamp Set (I cut apart the set of tools stamp)
  • Copic Markers
  • Sentiment is from an old stamp set - unknown manufacturer
  • Ranger Dye Ink - Blue Ribbon, Classic Cherry
To make the card, I first cut apart the set of tools stamp, since I needed the individual ones.  Using the 3.75 inch Wreath Builder Template,  I stamped the images with the Gina K ink.  There were then colored with Copic markers.  I then cut the wreath in half! A silver mat was added to a card base, and the top and bottom of the wreath added.  A strip of white card stock was matted with silver, and then added between the top and bottom parts of the wreath..  The sentiment was added to the complete the card.


Monday, June 10, 2019

A foiled Birthday Card

I think the theme of my cards for this year will be "Foiled".  I have also found that I am using my stencils more than I had before. I was in need of some birthday cards, that would work for a guy.  I think this colorful one is perfect.   I really like the way this one came out, and want to use this foil again.


For this card, I used:

  • Deco Foil Rainbow Foil
  • Deco Foil Transfer Gel
  • Judkins Square Asanoha Stencil
  • Altenew Beautiful Inside
  • Stampendous Detail White Embossing Powder
  • Versamark
To make the card, the stencil was placed on white card stock, and the transfer gel was added, making sure to only add the gel to a portion of the stencil.  The stencil removed, and once the gel was dry, the foil added using my Minc machine.  The foiled panel was trimmed down, and matted.  This was then added to the card base  The sentiment strip was stamped with Versamark, embossing powder added, heat set, and added to the card.

Monday, June 3, 2019

Anniversary and Birthday card with Deco Foil

Another Anniversary card with Deco Foil, a Stencil and Foil.  This is similar to the card I made last week, bust uses a different stencil.  In some ways I like this one better.


I used the "left over" part of the foil to make another card!  The picture for this card captures the look of the foil really good!.

For the Anniversary card, I used:
  • Deco Foil Transfer Gel
  • Deco Foil Amethyst Watercolor Foil
  • Fnnabair (Prima) - Doily Stencil
  • Laser Printer
  • Gina K Small and Large Circle dies
To make the card, I placed the stencil on a piece of white card stock.  The transfer gel was added and the stencil removed.  Once the gel was dry, the foil was added using my Minc machine.  The panel was added to the card base.  The sentiment was printed using a laser printer, cut using the circle die, foiled and matted and added to the card. This sentiment fit perfectly in the center of the card.

For the Birthday card, I used:

  • The left over foil from the Anniversary card
  • Sookwang tape
  • Elizabeth Craft Designs - Cool Diamond Microfine Glitter
  • Memento - Lulu Lavender Ink
  • Gina K Designs - You Make Me Happy stamp set
  • Gina K Designs - Small Circle Die
To make the card, I covered a piece of white card stock with the Sookwang double sided tape.  After removing the release paper on the tape, I added the left over foil, making sure it was well adhered.  I then removed the backing for the foil. I could have left it, but I wanted to add glitter, to the areas that were did not have foil.  I added the glitter, burnished it in.  The entire panel was matted and added to a card base.  The sentiment was stamped and then cut with the smallest of the circle dies.  This was added to the card as the last step.

The Anniversary card was entered in Simon Says Stamp Monday Challenge (Wedding/Anniversary)