Pages

Showing posts with label Simon Says Stamp. Show all posts

Monday, September 23, 2024

Lighthouse BIrthday Card

I love lighthouses.  I purchase stamps and dies that contain lighthouses.  So of course, when I saw the Hero Arts June 2023 kit I had to get it.  I also purchased the lighthouse die window die.  And here is a birthday card made with the kit and die:

I use the following for the card:

  • Hero Arts June 2023 Kit 
  • Hero Arts - Lighthouse Window Fancy Die
  • Gina K - Black Onyx, Powder Blue, Wild Dandelion, Ocean Mist, Turquoise Sea Inks
  • Simon Says Stamp - Clouds for Days Stencil
To make the card, I stamped the sun, water and birds using the stamps from the Hero Arts 2023 Kit.  The clouds were stenciled above the water line.  The Lighthouse Window die was used to cut a piece of black cardstock.  The image was then placed behind this piece, and the sentiment added.  The entire piece was added to an A2 card base to complete the card.


Monday, July 12, 2021

Sailboat Window View

 I gave this card to my Husband for Father's Day, but it could be used for a Birthday card as well.  

For the card, I used:

  • Gina K - By the Sea 2
  • Simon Says Stamp - Waves Stencil
  • Distress Ink - Stormy Sky, Tumbled Glass, Mermaid Lagoon, Squeezed Lemonade
  • Memory Box - Grand Madison Arched Window
  • Acetate
  • Prismacolor Colored Pencils
To make the card. I cut the window twice, once from a wood grained brown card stock, and once from a wood grained yellow card stock.  I then pieced the brown window frame into the yellow paper, and attached it using a little bit of tape.  Acetate was added to the window. Using the stencil and the blue distress inks, the water was created on a piece of white card stock.  I then created the sun with a blending brush.  The sailboat was stamped on white card stock, and colored with colored pencils.  It was fussy cut and added to the background piece. Foam tape was used to attach the background to the window.  This was then added to the card base to complete the card.

Challenges:
Simon Says Stamp Monday Challenge  - Lazy Days Of Summer

Monday, May 31, 2021

Rainbow Birthday Card

I've been using my Gansi Tambi watercolors a bit more these days.  I created a rainbow with some of the colors in my set, comparing how the colors look using different amounts of water.  Of course I had to make cards with my results!  And here they are:


I used the following for the cards:

  • Gansi Tambi Watercolors (I used  a red, orange, yellow, green, blue and purple from the set)
  • Gina K - Master Layouts 1 and 2 die sets
  • Simon Says Stamp - Happy die
  • Altenew - Birthday Greetings stamp set
  • Gina K - Black Onyx Ink
To make the cards, I watercolored the stripes using the rainbow colors from the watercolors.  I first used just a minimum amount of water, and then repeated it using a very watered down watercolor.  These were both then cut using one of the Master Layouts 2 dies.  The mat was cut from dark blue paper using one of the Mater Layouts 1 dies.  The watercolor panel was attached to the mat. The 'happy' was cut using the same blue and the 'happy' background from white.  These were added to the watercolor panel.  'birthday' was stamped below the word happy.  The entire panel was then added to the card base complete the card.

Thursday, April 15, 2021

Birthday Ballons

I decided that I would try to make my own stencil using acetate and dies that I already have.  I used the smaller balloons from the Simon Says Stamp Balloons Dies and cut them out from the acetate to make  the stencil!  I used that stencil to make this card:

To make this card I used:

  • Gina K - Master Layouts 1 and 2
  • Various Gina K inks
  • Simon Says Stamp - Balloons Dies (used to create a stencil)
  • Simon Says Stamp - Happy die
  • Altenew - Birthday Greetings Stamp set
  • Blender Brushes
  • Memory Box Twinkling Jewel Glitter Paper Pad
  • Acetate
To make the card, I first cut out the smaller balloon shapes from the acetate to make a stencil.  The stencil was used to create the background for the card.  I used blender brushes to apply the ink through the stencil.  I used a variety of colors for the balloons.  The panel was cut using the stitched rectangle from Master Layouts 2.  I used glitter paper as a mat for the card, cut out using one of the Master Layout 1 dies to give me a wider border.  I cut 'happy' from the same glitter paper.  The shadow portion was cut from white card stock.  These were then attached to the balloon panel and 'birthday' was stamped beneath it. The panel was added to the glitter paper mat and the entire piece to the card base to complete the card.

Tuesday, December 22, 2020

Snowy Penguin Christmas Card

For this card, I used a lot of different dies from different manufacturers.  I am very glad that I have a Gemini Junior, since this card is all die cutting, it saved a lot of time.  


I used the following for the card:
  • Elizabeth Craft Designs - Chilly The Penguin Die
  • Hero Arts - Snowflake Edge Fancy Die
  • Simon Says Stamp - Maryanne Snowflake Die
  • Creative Expressions - Let it Snow Die
  • Memory Box - Winter Tiny Snowflakes Stencil
  • Vicki Boutin - Iridescent Glitter Texture Paste
To make the card, all of the elements were die cut.  I used a dark blue card base, and added the iridescent glitter paste through the Memory Box stencil.  It doesn't show up much in the photo, but the effect was stunning.  Once the glitter paste was dry all of the elements were added to complete the card.
 

Monday, September 2, 2019

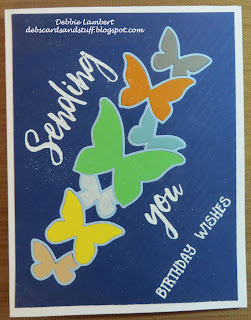
Butterfly Drift Birthday Card

For my birthday I got a Gemini Jr.  I had to try it as soon as I got it.  So I chose a die that I had trouble with in my Cuttlebug, which was Butterfly Drift.  I cut it several times with different color card stock and made this card:


I had no problem with the die and love the machine. It will be my go-to die cutting machine from now on.

To make the card I used:
Simon Says Stamp - Butterfly Drift die
Honey Bee Stamps - Sending You Sentiments stamp set
Stampendous - Detail White Embossing Powder
Versamark

To make the card, I cut various colors of card stock with the die.  These were then added to a piece of dark blue card stock.  The sentiments were added, and the entire image added to a card base to complete the card.

Monday, March 4, 2019

An alcohol ink background used!

I finally decided that I needed to use the alcohol ink backgrounds I have been making.  I recently saw a similar design to this on Pinterest which took me to the My Impressions Blog. I decided to do something similar, and here is the card I made:


To make this card, I used the following:

Simon Says Stamp Balloon Dies
Simon Says Stamp Stitched Rectangle Dies
Simon Says Stamp Birthday Celebration Stamp Set
Alcohol Ink
Yupo Paper

Using an Alcohol Ink background I had previously made, I cut several balloons using the Balloon dies.  These were then added to white card stock an cut using a Stitched Rectangle die.  The sentiment was then added, and the panel added to a card base to complete the card.


Monday, October 1, 2018

A Pumpkin Halloween Card

For this Halloween card, I used a variety of supplies, and also tried a comparison of my Prismacolor and Faber-Castell Polychromos pencils.  One card was done with the Prismacolor pencils, the other with the Faber-Castell.  Overall, to me the pencils are similar, but I liked the feel of the Polychromos better.  They just seemed to be smoother.

Here are the cards:

Faber-Castell Version:
 Prismacolor Version:

I used the following for the cards:
Gina K - Sweet Mango Foil
Deco Foil - Pumpkin Patch Clear Toner Sheets
Simon Says Stamp - Stitched Rectangles
Hero Arts Infinity Dies - Oval
Prismacolor Pencils
Faber-Castell Polychromos Pencils
Gina K Amalgam Ink
Hampton Art - Halloween Stamp

To make the card, I stamped the image on white card stock with the Gina K amalgam ink and colored with the colored pencils (either Prismacolor or Faber-Castell).  The image cut with the oval dies, and a second oval, slightly larger was also cut as a mat.  I foiled the clear toner sheet.  A rectangle frame was cut with the Stitched Rectangle dies.  The foiled image was cut to fit the black frame, and added to the frame.  The stamped pumpkins were added on top of the foiled image.  This was them added to the card base.

Monday, April 2, 2018

MFT Beach Day Birthday Card

A bit of a story behind this card.  My daughter-in-law loves pigs.  When she heard that you can swim with the pigs in Exuma, Bahamas they went! Well, she got bit by one of the pigs ... nothing serious - more of just a bruise.  So I just had to make this card for her for her birthday!


(and the red mark on her leg is not an ink blot!  Its to symbolize where the pig bit!)

I used the following for the card:

  • MFT Beach Day Stamp set
  • Prickley Pear - Pig stamp
  • Simon Says Stamp Wave Stencil
  • Distress Ink - Tumbled Glass, Broken China
  • Various Copic Markers
  • MFT Handwritten Happiness Stamp set
  • Ranger Caribbean Coast Ink
To make the card, I used the Wave Stencil and sponged the Broken China ink over it.  After removing the stencil, I sponged Tumbled Glass over the entire area.  The Pig was then stamped (I needed to learn how to reverse the image!), and masked.  The Girl was then added.  Both were colored with carious Copic markers.  The sand and Sky were then added with Copic Markers.  The sentiment was added last.  The entire panel was matted and added to the card base to complete the card.

Monday, December 25, 2017

Merry Christmas with SImon Says Stamp Christmas Token Die

Merry Christmas!  Here is the a simple Christmas Card made with the Simon Says Stamp Christmas Token Die:


To make this card, I used the following:

  • Simon Says Stamp Christmas Token Die
  • Distress Oxide Ink - Broken China, Faded Jeans, Salty Ocean
  • Perfect Pearls - Perfect Pearl 
To make the blue background, I used the Distress Oxide Inks lightest to darkest, for a bit of an ombre look.  This was then spritzed with water mixed with the Perfect Pearls.  I then cut our the Christmas Token, (saving it for another card).  The Christmas Token was then cut from white card stock.  The blue background was then added to a dark blue card base.  The white Christmas token was added to complete the card.

And here is the card I made with the left over Christmas token:

The background for this card was made using the  Close to My Heart Snowflakes Seasons and Nature stamp set.  The snowflakes from that set were stamped with  Memento Summer Sky ink and Brilliance Platinum Plant ink.  The Token was then added on top of the card base.

Monday, July 31, 2017

Birthday Card with Perfect Pearls

I recently saw this card made by Justine Hovey, and once again, I had all of the supplies so I made my own version of the card.  You can't see the shine of the Perfect Pearls in the picture, but its very visible in person!


I used the following to make the card:

  • Versafine Black Onyx Ink
  • Zig Clear Embossing Powder
  • Perfect Pearls - Forever Red, Forever Blue, Forever Green, Forever Violet
  • Pretty Pink Posh Sequins - Lime Sorbet and Aquamarine
  • Greenhouse Society - Stems stamp set (for the greeting)
  • Versafine
  • Simon Says Stamp Floral Sparkle Die
To make the card, using white card stock, cut slightly smaller than the card base, I cut the flowers using the Floral Sparkle die.  The sentiment was stamped using Versafine Black Onyx ink, clear embossing powder added and heat set.  On the card base, I masked the edges, and then added Versafine to the left side.  Perfect Pearls were then added to the area.  The top piece was then added to the card base.  Sequins were added to complete the card.

Monday, July 17, 2017

Birthday Card with Deco Foil "Leftovers"

Ever since I started foiling, I have these left over pieces of foil.  I've been trying to use these leftovers in making cards.  Here is a card that I made with some of the leftovers.  Of course, I ended up with more leftovers - which I will use on another card in the future!

I used the following:
  • Toner Sheets
  • Heidi Swapp Minc Holographic Foil, Blue Foil
  • CTMH Celebration Stamp Set
  • Versamark
  • Stampendous Detailed White Embossing Powder
To make the card, I used a left over piece of blue foil, which was the "leftover" piece for this card.  It was leftover from a previous card I made using Simon Says Stamp Circular Rose stencil.  This leftover was added to a toner sheet.  Since there was still a large area of toner sheet, I then added the Holographic foil.   Since this is very shiny - I needed to tone it down a bit, by embossing a sentiment to vellum.  This was then added to the foiled piece, and added to the card base to complete the card.


Thursday, July 13, 2017

Deco Foil Transfer Gel Foiled card

Here is another Foiled card I made:


For this card, I used the following:

  • Simon Says Stamp Circular Rose Stencil
  • Deco Foil Transfer Gel
  • Heidi Swapp Blue Foil
  • Memento Danube Blue Ink
  • CTMH Joyful Birthday Occasions
To make the card, I secured the stencil to a piece of paper, and then added a thin layer of Deco Foil transfer gel.  Once it was dry, I added the blue foil.  This was then cut down to 4x4 and added to the card base.  I carefully added two score lines below the image and to the bottom of the card.  The sentiment was then added to complete the card.

Monday, July 10, 2017

Foil left overs made into cards

After having created some great foiled cards, I had left over pieces.  What do do?  Make some cards. Here are the cards:

Card #1:


Card #2:

For the first card, I had some left over Sweet Mango Foil, from foiling a piece of Gina K Elegant Damask paper.  I added the foil to a piece of toner paper.  Once I looked at it I realized it looked very "Halloweeny", so a Halloween card was made.  I used Lawn Fawn Spooktacular stamps and stamped the pumpkin using Sweet Mango ink, and the hat with Memento Black Ink.  Both were colored with Copic markers.  I then cut the image with a Spellbinders Classic Oval die and sponged over it with more Sweet Mango ink.  This was then matted with black.  I colored a bit of ribbon with the ink as well.  The ribbon was added to the foiled piece, then the pumpkin image added to complete the card.

For the second card, I again used toner paper, and foiled with a left over piece of Wild Lilac foil.  With this card, it needed a lighter background, so I then added Heidi Swapp silver foil.  I used one of the Happy Birthday Gina K Foil Mates sentiments.  This was cut using a Simon Says Stamp Square Stitched dies, and foiled with Wild Lilac foil.  It was matted with black paper.  Ribbon and a bow were added to the main foiled piece, and the sentiment added to complete the card.

Monday, May 15, 2017

Glittery Mothers Day Card

The picture doesn't show how glittery this card actually is!  This card uses an image stamped using the essential glue pad, and glitter.  Its a technique I've tried before, but this is the first time I got it to work.  I think in the past I wasn't patient enough, and didn't let the glue get to the tacky point.


For this card I used the following:

  • Greenhouse Society Rose Stamp
  • Glitter Ritz - Java Bean, Sea Green, Pink
  • Essential Glue Pad
  • Close To My Heart - Just to Say Stamp Set
  • Simon Says Stamp Stitched Rectangles

To make the card, I stamped the image using the Essential Glue Pad.  I waited until the glue was tacky, and then added the glitter to the image, using Java Bean for the stem, Sea Green on the leaves and Pink for the rose.  The image was cut with the Stitched Rectangle die, and ribbon was added.  This was then added to the card base and the sentiment added to complete the card.

Monday, February 27, 2017

Art Impressions Watercolor Birdhouses

Here is a card I made with Art Impressions Watercolor stamps.  I love these stamps, and the process to make watercolor images!

I used the following to make the card:

  • Art Impressions Flower Set #4052, Foliage Set #4051, WC Series Set 2 #3545
  • Distress Markers Abandoned Coral, Wilted Violet, Pine Needles, Picked Raspberry, Mowed Lawn
  • Molotow Masking Fluid
  • Close to my Heart Just to say Stamp Set
  • Versamark 
  • Stampendous Detailed White Embossing Powder
  • Simon Says Stamp Stitched Rectangles
  • My Favorite Things Watercolor Wash Paper
To make the card, I first created the fence using the Molotow Masking Fluid pen.  Once it was dry, I stamped the images by coloring the stamps with the distress pens, and adding water to the images to give a water colored image.  The masking fluid was then removed, and detail was added.  The image was then cut with one of the stitched rectangle dies.  This was then added to a piece of Watercolor wash paper.  I made the card base by cutting out a larger rectangle with a stitched rectangle from the center of the card front.  The sentiment was stamped with Versamark, detailed white embossing powder added and heat set.  The image was then added to complete the card.


Monday, September 26, 2016

Bicycle Balloon Birthday Card

Another quick birthday card, for the bicyclist lover.


The card is 4.25 x .5.5 and I used the following to make the card:

  • Simon Says Stamp - Balloon Dies (111338)
  • Cricut Going Places - Bicycles
  • Bakers Twine
  • Pretty Pink Posh Sea Breeze Sequins


To make the card, I cut the balloon using the Balloon die from patterned paper.  The bicycles were cut from using my Cricut machine and the Going Places cartridge in various sizes.  These were then added to the balloon.  Bakers twine was added to the balloon and the balloon was added to the card base.  Sequins were added to complete the card.

Monday, August 29, 2016

Another Art Impressions Watercolor card

Here is the second card I made with Art Impressions Watercolor stamps.  I have ordered additional stamps, since there is so much more I can imagine do with these stamps!


I used the following to make the card:

  • Art Impressions WC Trees, EZ Project B, Foliage Set
  • Various Distress Markers 
  • Simon Says Stamp Stitched Squares
  • Elizabeth Craft Designs Peel-off Stickers (Happy Birthday  #390)

Monday, August 15, 2016

My First Art Impressions Watercolor

I really like the Art Impressions Watercolor stamps.  Using these stamps you really get a watercolor look with the stamps. I originally purchased a few sets, but now I want them all!   Here is the first card I made with the stamps I had:


I used the following to make the card:
  • Art Impressions WC Series 7 Set 2 stamps, Foliage Set and Flower Set
  • Distress Markers Mowed Lawn, Tumbled Glass, Wilted Violet, Picked Raspberry, Spiced Marmalade, Cracked Pistachio, Vintage Photo
  • Simon Says Stamp Stitched Rectangles
  • Lawn Fawn Polka in the Meadow

This card was entered in the Simon Says Stamp Monday Challenge: Summer Fun

Monday, May 16, 2016

Water coloring Stamped Images (Day2)

Day 6 of the Watercolor for Card Makers (at Online Card Classeswas water coloring Stamped images. 

Here are my versions of the cards from Day 6 of the class.  I won't go into specific of how the cards were made (for this you should take the class), but will provide the supplies I used. Here are the 3 cards I made using the techniques from the class.

Card 1:
 Card 2:
 Card 3:

For Card 1 (One of my favorites!) I used the following:

  • Versafine Black Onyx Ink
  • Zing Clear Embossing Powder
  • Penny Black Blooming Garden Stamp Set
  • Distress Ink: Wild Honey, Tumbled Glass, Squeezed Lemonade, Dried Marigold, Worn Lipstick, Mowed Lawn
  • Close to My Heart A Little Note Occasions Stamp Set
  • Spellbinders Square Dies

For Card 2 I used the following:

  • Simon Says Birthday Celebration
  • Versafine Black Onyx Ink
  • Kuretake Water Colors: 10, 20, 34, 63, 54, 58, 139, 43
  • Close to My Heart Joyful Birthday Occasions Stamp Set
For Card 3, (this one has a lot of sparkle and shine, since I used perfect pearls in the water used), I used the following:
  • WPlus9 Flora & Fauna 2 Stamp Set
  • Versmark
  • Stampendous Detailed White Embossing Powder
  • Distress Ink: Weathered Wood, Shaded Lilac, Squeezed Lemonade, Spiced Marmalade, Candied Apple, Salty Ocean
  • Perfect Pearls
  • Close to My Heart Just to Say Stamp Set