Pages

Showing posts with label Foil. Show all posts

Saturday, December 21, 2024

Christmas Bows

I've always liked the Ton Stamps stencils and layering stamps.  I finally bought the Grouped Grand Bows and associated die a few years ago. But buying it and using it are two separate things! Well this year, I finally used the stamp and die!


 I used the following for the card:

  • The Ton Stamps - Grouped Grand Bows and associated Die
  • Gina K Designs - Lipstick, Red Velvet, Applemint, Christmas Pine, Powder Blue, Blue Denim, Lemon Drop, Prickly Pear Ink
  • Gina K Designs - Holiday Greeting Sentiment Sheet
  • Gina K Designs - Radiant Red Foil
To make the card, I stamped the images and die cut them.  The sentiment was foiled using the Radiant Red Foil. The images were added to the card base. The sentiment was added between the bows to complete the card.

Monday, December 16, 2024

Modern Poinsettia

For these cards, I used the Modern Poinsettia Stencil.  I found that I was able to cut these so that I was able to make 2 mini-slimline cards from one stenciled image!  


 I used the following for the cards:

  • Gina K Designs - Modern Poinsettia Stencil
  • Gina K Designs - Red Hot, Cheery Red, Christmas Pine Inks
  • Altenew - Ultimate Metallic Gold Ink
  • Gina K Designs - Holiday Floral Poly Glaze Sheets and Dies
  • Gina K Designs - 14 Carat Gold Foil
  • Gina K Designs - Master Layouts 1 and 7
To make the cards, I stenciled the image on a 6 x 6 piece of paper.  The image and associated mats were cut from Master Layouts 7 (and a one done from ML 1).  These were added to the card base.  The sentiments were foiled with 14 carat gold foil, and die cut using the associated dies.  The sentiments were then added to the card base to complete the card.

Friday, December 13, 2024

Holiday Floral Poinsettia

The Holiday Floral set contains the usual stamps and dies.  But there is also stencils and poly-glaze sheets.  The stencils to color the images and the poly-glaze so the outlines can be foiled;  For these cards, I used the poly-glaze, stencils and dies.  I love the way the cards came out!


 I used the following for the cards:

  • Gina K Designs - Holiday Floral Poly-Glaze, Stencils and Dies
  • Gina K Designs - Lipstick, Bubblegum, Grass Green, Medium Spruce and Red Hot Inks
  • Gina K Designs - 14 Carat Fancy Foil
  • Gina K Designs - Master Layouts 1, Small and Large Oval Dies
  • Gina K Designs - Poly-Glaze sheets
To make the card, I first foiled the images from the poly-glaze sheets.  The sentiments were also foiled.
(I used the left over foil from the sentiments and the plain poly-glaze sheets to foil as well).  Using the stencils the images were colored.  The sentiments and images were cut with the associated dies.  Master Layouts 1 was used to cut the white panel and mat.  These were then added to the card base.  The small and large ovals were used to cut the white panel and the associated mat.  These were then added to the card base.  The floral image and sentiment were then added to complete the card.

Saturday, December 7, 2024

Snowflake Christmas Cards.

I love the way these cards came out!  The brilliance and shininess just doesn't photograph well. These cards are SO pretty in real life. The Poly-glaze sheets from Gina K Designs makes using the left over foil a breeze! 


For these cards I used:
  • Creative Vision Stamps - Foilables
  • Gina K Designs - Poly-glaze Sheets
  • Gina K Designs - Radiant Red and Brilliant Blues Fancy Foils
  • Gina K Designs - Holiday Greetings Sentiment Sheets
To make the cards, I foiled the Sentiment Sheets, and the Foilables with the Red and Blue Fancy Foils.  I foiled using the leftover foil and the poly-glaze sheets, leaving no waste.  The foiled snowflake backgrounds were added to card bases. The sentiments were then trimmed and added to the cards.


Sunday, February 14, 2021

Valentines Day card

I have no small heart stamps and no heart background papers!  I needed one or the other for the Valentines day card I was creating.  So what was  I going to do?  I decided to create my own!  So, using my computer, I created the hearts, printed it on Hamilco paper using a laser printer, and foiled it using my Minc machine.  It ended up perfect for this card.


To make this card, I used:
  • Gina K - Master Layouts 1 and 2, Small and Large Circle Dies
  • Art Impressions - Valentines Critters
  • Versamark
  • Stampendous Detail White Embossing Powder
  • Various Copic Markers
  • Heidi Swapp - Red Minc Foil
  • Memento Tuxedo Black Ink
To make the card, I first created the background, (creating the hearts, printing on a laser printer and foiling).  The foiled heart background was then cut with one of the dies from Master Layouts 2, and the black mat from the same set.  This was then added on the card base.  The porcupine was stamped with Memento ink on Neenah solar white paper, and colored with various colors of Copic Markers.  The image was then cut using one of the small circle dies.  The black mat was cut with the associated large circle die. Using foam tape this was then attached to the card base.  The sentiment was stamped using Versamark, Embossing Powder added and heat set.  This was then added to the card with foam tape as well, to complete the card. 

Friday, October 23, 2020

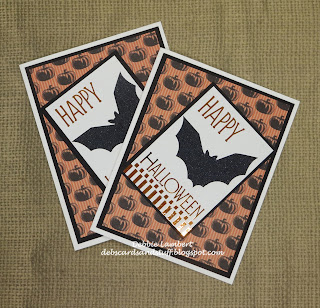
Foiled Halloween

I like the look of foil on a card!  I just wish it photographed better!  A while back I picked up a pack of Halloween Bats that were foilable, and of course I needed to use them to make Halloween cards.


I used the following for the cards:

  • Creative Vision Stamps - Happy Halloween foil-able images
  • Gina K - Sweet Mango Foil
  • Unknown - Black Glitter Foil
  • Patterned Paper by Recollections
To make the cards I first foiled the image using a Minc machine,  Sweet Mango foil was used for the sentiment, and the glitter foil used for the bat.  The foiled image was then mounted on black card stock.  The pumpkin patterned paper was mounted on black, and then added to the card base.  The image was added at an angle to complete the card.

Monday, August 10, 2020

A Hamilton Birthday Card

My niece is obsessed with Hamilton.  So when Cathy Zielske provided a printable card, with the Hamilton image, I knew I needed to use it somehow for a card.  

I really wanted to use foil for the gold  background.  So, using Adobe Photoshop Elements, I reversed the colors in the image, added the happy birthday, and printed it on black paper.  I then foiled the image and added a black mat, and placed it on the card base to complete the card.


Monday, December 17, 2018

Foiled Christmas Cards

Last year I picked up all of the supplies to make these cards, I just didn't get to it until this year!  These cards were very quick to make.

I used the following to make the cards:

  • Gina K Foil Mates and Fancy Foil
  • Heidi Swapp Minc Foil and Minc Paper
  • Sookwang double sided tape
To make the cards, I ran the different papers through my Minc using various foils.  The paper was then cut to size and added to a card base. The Gina K Foil Mate sentiments were foiled and then cut using circle and oval dies, and added to the cards.

I used the left over foil for cards as well!  To do this, I added a piece of Sookwang tape to white card stock, and then carefully added the foil.  I was able to do this with both the backgrounds and sentiments!  These were then added to card bases.  I think that in some cases, I liked these better.

Monday, October 22, 2018

Foiling with an Altenew Stencil

I love the look of foil on a card - I just wish I could photograph it better.  Here are two cards I made with foil and an Altenew Stencil:


I used the following to make the cards:

  • Altenew Leaf Burst Stencil
  • Deco Foil Transfer Gel
  • Darice Adhesive Strips
  • Ranger Dye Ink - Caribbean Blue
  • Memento - Rose Bud Ink
  • Deco Foil - Lapis Watercolor, Summer Rainbow
  • Close To My Heart - Celebration Stamp Set
To make the cards, I secured the stencil to a piece of white card stock and added the Transfer Gel, and then removed the stencil.  Once the gel was dry, I added the foil using my Minc machine.  The foiled image was then matted and added to a card base.  The sentiments were stamped in an ink that matched the foil and mat.  These were then cut to size, and added to the card using adhesive strips.  

Monday, January 8, 2018

Happy Birthday with Altenew and Gina K

Here is a card I made after watching a Jennifer McGuire video (see it here).

To make the card, I used the following:

  • Gina K Foilmates - Birthday
  • Gina K Fancy Foil - Wild Lilac
  • Hero Arts - Infinity Dies Nested Ovals
  • Altenew - Peony Bouquet Stamp Set
  • Altenew Ink - Soft Lilac, Lavender Fields, Deep Iris, Frayed Leaf, Forest Glade, Evergreen
To make the card, I stamped all layers of the flower and leaves in the lower right corner.  The remainder of the card was stamped using only one of the flower layers in the lightest purple ink.  The leaves were also added in the background using the lightest green ink.  A Foilmates Birthday sentiment was foiled using Wild Lilac foil.  This was then cut with one of the oval dies.  The next largest oval was cut using black paper.  The foiled image was added to the black oval and the entire piece added to the card.

Monday, December 11, 2017

Foiling with Stencils

I like the look of foil on cards, and using a stencil is a great way to add foil.  Here are some Christmas cards made with a stencil:


A close-up look at each card:


To make these cards, I used the following:
  • Heidi Swapp Minc Foil Red and Green
  • Gina K - Let it Snow Stamp Set
  • Memento Brilliance - Platinum Planet Ink
  • Deco Foil Transfer Gel
  • Tim Holtz - Holiday Script Stencil

To make the card, I first stamped snowflakes (from the Gina K Let it Snow Stamp Set) with Platinum Planet ink, all over the card stock.  I then placed the stencil over the stamped snowflakes, and added the Transfer Gel.  The stencil was removed, and once the gel was dry, the image foiled with either the Red or Green foil.  The entire image was cut down and added to the card base to complete the card.

Monday, July 17, 2017

Birthday Card with Deco Foil "Leftovers"

Ever since I started foiling, I have these left over pieces of foil.  I've been trying to use these leftovers in making cards.  Here is a card that I made with some of the leftovers.  Of course, I ended up with more leftovers - which I will use on another card in the future!

I used the following:
  • Toner Sheets
  • Heidi Swapp Minc Holographic Foil, Blue Foil
  • CTMH Celebration Stamp Set
  • Versamark
  • Stampendous Detailed White Embossing Powder
To make the card, I used a left over piece of blue foil, which was the "leftover" piece for this card.  It was leftover from a previous card I made using Simon Says Stamp Circular Rose stencil.  This leftover was added to a toner sheet.  Since there was still a large area of toner sheet, I then added the Holographic foil.   Since this is very shiny - I needed to tone it down a bit, by embossing a sentiment to vellum.  This was then added to the foiled piece, and added to the card base to complete the card.


Thursday, July 13, 2017

Deco Foil Transfer Gel Foiled card

Here is another Foiled card I made:


For this card, I used the following:

  • Simon Says Stamp Circular Rose Stencil
  • Deco Foil Transfer Gel
  • Heidi Swapp Blue Foil
  • Memento Danube Blue Ink
  • CTMH Joyful Birthday Occasions
To make the card, I secured the stencil to a piece of paper, and then added a thin layer of Deco Foil transfer gel.  Once it was dry, I added the blue foil.  This was then cut down to 4x4 and added to the card base.  I carefully added two score lines below the image and to the bottom of the card.  The sentiment was then added to complete the card.

Monday, July 10, 2017

Foil left overs made into cards

After having created some great foiled cards, I had left over pieces.  What do do?  Make some cards. Here are the cards:

Card #1:


Card #2:

For the first card, I had some left over Sweet Mango Foil, from foiling a piece of Gina K Elegant Damask paper.  I added the foil to a piece of toner paper.  Once I looked at it I realized it looked very "Halloweeny", so a Halloween card was made.  I used Lawn Fawn Spooktacular stamps and stamped the pumpkin using Sweet Mango ink, and the hat with Memento Black Ink.  Both were colored with Copic markers.  I then cut the image with a Spellbinders Classic Oval die and sponged over it with more Sweet Mango ink.  This was then matted with black.  I colored a bit of ribbon with the ink as well.  The ribbon was added to the foiled piece, then the pumpkin image added to complete the card.

For the second card, I again used toner paper, and foiled with a left over piece of Wild Lilac foil.  With this card, it needed a lighter background, so I then added Heidi Swapp silver foil.  I used one of the Happy Birthday Gina K Foil Mates sentiments.  This was cut using a Simon Says Stamp Square Stitched dies, and foiled with Wild Lilac foil.  It was matted with black paper.  Ribbon and a bow were added to the main foiled piece, and the sentiment added to complete the card.

Monday, June 12, 2017

FIrst Try with GLitter Foil

A while back, I got some foil and glitter foil from HSN to use with my Minc machine.  I finally had a chance to use the Glitter foil, and I was not impressed.  I was expecting complete coverage, but it ended up having a more distressed look.  (I did run this through the Minc, at setting 5, twice!). I'm not sure if I will be using the Glitter foil again.

I did make a card with it, and used matching foil for the sentiment.

To make the card, I used:

  • Heidi Swapp Minc Paper Packet
  • Glitter Foil and Foil from HSN
  • Gina K Foilmates for the sentiment
  • Spellbinders Classic Squares Dies
To make the card, I used the Glitter foil on the stripe paper included in the packet.  I ran this through the Minc twice, with a heat setting of 5.  This was then trimmed to size and matted on black card stock and added to the from of the card.  For the sentiment, I used a Gina K Foilmate sentiment.  This was cut with one of the square dies, and then foiled.  It was also matted in black, and added to the from of the card using pop dots, to add a bit of dimension.

Monday, February 1, 2016

Foiled Birthday Card

So I got a mini Minc for Christmas, and just had to use it.  Here is the card I made:


I used the following to make the card:
  • Darice Background Stamp - Music
  • Memento Danube Blue Ink
  • Tim Holtz Celebration Words Dies
  • Deco Foil - Silver Star
  • Heidi Swapp Signature Paper 6x6

To make the card:
  1. I stamped the background image with Memento Blue Danube Ink.  This was then trimmed to slightly smaller than the card front, and attached it.
  2. I trimmed a piece of the Heidi Swapp paper, to the needed size, and the deco foil to slightly larger.  This I ran through the Minc machine.
  3. The foiled image was then matted with the same blue as the card front and attached to the card front.
  4. The sentiment was cut from the Celebration Word Dies and attached to complete the card.