Pages

Friday, December 23, 2022

Another card made with the Holiday Tapestry stamp set.

I needed more Christmas cards, and used another of the stamps from the Gina K Holiday Tapestry stamp set for them.


For this card I used:

  • Gina K Designs - Holiday Tapestry stamp set
  • Stampendous - Detail Gold Embossing Power
  • Versamark
To make the card, the image and sentiment were stamped with Versamark, embossing powder added and heat set.  The panel was then trimmed and matted with gold paper.  This was added to the card base to complete the card.


Friday, December 16, 2022

Holiday Tapestry

 I think this is my favorite card made this year!

I used the following for the card:

  • Gina K Designs - Holiday Tapestry stamp set
  • Stampendous - Detail Gold Embossing Powder
  • Versamark
  • Gina K Designs - Small Circle Dies
To make the card, I stamped the image multiple times using Versamark.  The embossing powder was added and heat set.  Each strip was cut and matted with gold paper.  The strips were then added to another mat, this time green.  This piece was matted yet again in gold and added to the card base.  The sentiment was stamped with Versamark, embossing powder added and heat set. This was then cut with the circle die and added to the card.

Friday, December 9, 2022

Taylored Expressions Create-In-Quads Snowflake

So I just had to give the Taylored Expressions Create-In-Quads stencils a try.  I got the snowflake one since Christmas was coming up and I needed something new for my cards.  I was surprised at how different each color combination ended up looking.  As a plus, I got 4 cards per color combination! I ended up using a variety of inks and sentiments,


I used the following for the cards:

  • Taylored Expressions - Create-In-Quads Snowflake Layering Stencil
  • Inks from Gina K, Altenew, Distress Oxides
  • Gina K Designs - Seasonal Greetings, Simple Snowflakes stamp sets
  • Lawn Fawn - Winter Scripty Sayings stamp set
  • Creative Expressions - Let It Snow die
  • Spellbinders - Oval dies
  • Versamark
  • Wow - Metallic Brass Embossing Powder
To make the cards, the snowflakes were stenciled using a variety of inks.  The panels were then cut apart for 4 cards.  The sentiments stamped or die cut in coordinating inks and papers.  The panels were matted and added to the card base to complete the cards.
 

Monday, November 28, 2022

Lilac Delightful Blooms

I have found that I like using layering stencils.  This card was made using the Delightful Blooms layering stencil from Gina K Designs.

For this card I used:
  • Gina K Designs Ink - Light, Medium and Dark Lilac, Light and Medium Spruce, Prickly Pear, Wild Dandelion, and Black Onyx
  • Gina K Designs - Master Layouts 1
  • Gina K Designs - Wilk Blossoms stamp set
  • Gina K Designs - Delightful Blooms stencil
To make the card, the stencils were used to create the flowers.  This was done on a 6 x 6 piece of paper.  Once the flowers were complete, I used Master Layouts 1 to cut the image.  The black mat was also cut.  The flower panel was added to the mat, and the entire piece added to the card base.  The sentiment was the added to complete the card.


Thursday, November 24, 2022

Card for my new great-nephew

My nephew has had his first child!  Of course a card is in order.  Cricut Design Space has some great images that can be used for a baby card.  I also have had some velvet sheets that I haven't used (don't remember why I got them).  I used them for this card, and it added such great fuzzy like texture.


Monday, November 21, 2022

Thanksgiving Cards

 A few more cards made using the Autumn Splendor card kit from Gina K Designs.  This is a great kit for Fall and Thanksgiving cards!


To make the cards I used:
  • Gina K Designs - Autumn Splendor Paper and Ephemera
  • Gina K Designs - Black Onyx Ink
  • Gina K Designs - Large and Small Oval Dies, Master Layouts 1
  • Gina K Designs - Everything Nice, Doodled Autumn, Rustic Autumn stamp sets for the sentiments
To make the card, I cut the patterned paper and mats using Master Layouts 1.  These were added to the card base.  The large ovals were cut with the same color used for the mats.  The small ovals were cut using white paper.  The ovals were then added to the card base. The sentiments were stamped, on the white ovals, and the ephemera added to complete the card.


Monday, November 14, 2022

Give Thanks

Autumn Splendor Ephemera from Gina K Designs along with the Autumn Wreath Builder stamps make for great Fall or Thanksgiving cards it just depends on the sentiment.

I used the following for the card:

  • Gina K Designs - Master Layouts 1 and 4
  • Gina K Designs - Fresh Asparagus, Faded Brick, Sweet Corn, Honey Mustard, Black Onyx Inks
  • Gina K Designs - Everything Nice Stamp Set, Autumn Wreath Builder Stamp Set
  • Gina K Designs - Autumn Splendor Ephemera 
To make the card, I first created the wreath using the Autumn Wreath Builder Stamp Set.  I then cut the wreath in half.  A black mat was cut using Master Layouts 1, and the wreath added to the top and bottom portions of the mat.  The white and black section was then cut from Master Layouts 1 and added to the middle section of the card.  The oval and black mat were cut from Master Layouts 1 and added in the center of the card.  The sentiment was then stamped in the oval.  The ephemera was added to the bottom section of the oval to complete the card.


Monday, October 17, 2022

Happy Halloween!

I was able to use some of the Halloween patterned paper I've had for a while to make these mini slimline cards!


I used the following for the cards:

  • Gina K Designs - Master Layouts 7
  • Gina K Designs - Best Witches stamp set
  • Gina K Designs - Black Onyx ink
  • Recollections - Halloween Phrases stamp set
To make the cards, I cut the patterned paper and the associated orange mats using Master Layout 7 dies. The longer pieces were added to a Kraft card base.  The smaller rectangle areas (which are patterned paper) and associated orange mats were cut from Master Layouts 7.  The pieces were added the card. The bat and sentiment were then stamped in the smaller rectangle area to complete the card.   

Monday, October 10, 2022

Botanical Duo Birthday Card

Sometimes an idea just doesn't work, but that doesn't mean that everything had to be thrown out.  I was able to use the background for this card. 
 

I used the following to make the card:
  • Gina K Designs - Friendly Silhouettes stamp set
  • Gina K Designs - Botanical Duo dies
  • Gina K Designs - White Pigment Ink
  • Gina K Designs - Master Layouts 1
  • Honey Bee - Sentiment Strips dies
  • Stampendous - Detail White Embossing Powder
  • Craft Consortium - Inky Drops - Candy
  • Memory Box Glitter Paper
To make the card, the Craft Consortium and Memory Box papers were cut with Master Layouts 1. The Craft Consortium paper was added to the Glitter paper mat. The entire panel was added to a white card base. Botanical Duo dies were used to cut the flowers and leaves and added to the card.  The sentiment was stamped using white pigment ink, embossing powder added and heat set.  The sentiment was cut using the banner dies and attached to the card using foam tape completing the card.

Monday, October 3, 2022

A Fall Anniversary Card

For this card, I used a layout based on one used in a Gina K YouTube video

I used the following:
  • Various Distress Inks 
  • Gina K Designs - Bodacious Bloom Stencil
  • Gina K Designs - Foliage Fillers Die
  • Gina K Designs - Fresh Asparagus, White Pigment Inks
  • Gina K Designs - Master Layouts 2
  • Clearly Besotted - Tiny Type Stamp set
  • Stampendous - Detail White Embossing Powder
  • Honey Bee - Banner Builder Dies
To make the card, I did some ink smooching using Distress Inks on watercolor paper, using a variety of fall colors.  Once the panel was dry, I cut the leaves from the panel using Foliage Fillers.  A piece of white paper was cut using Master Layouts 2 (along with the black mat). In the center of the white panel, a portion of the background part of the stencil was inked using Fresh Asparagus Ink and a blender brush.  The leaves were then added on top of this inked area.  The sentiment was stamped on black paper using white pigment ink.  Embossing powder was added and heat set.  The sentiment was then cut using the banner builder dies and added to the white panel using foam tape.  The panel was then added to the black mat, and the entire piece added to the card base to complete the card.

Monday, September 26, 2022

Another Mini Slimline Card

I recently found a great layout for mini slimline cards from @jess.crafts (jesscrafts.com - mini slimline #2).  I used it the layout and some old Gina K patterned paper for this card:


I used the following for the card:
  • Gina K - Happy and Shadow die
  • Gina K - In the Navy Ink
  • Gina K - Summer Silhouettes stamp set
  • Gina K - Casual Friday 6x6 Patterned Paper 
To make the card, I cut the paper according to the layout, and assembled the card. I then cut happy and the associated shadow, and added these to the card.  Birthday was stamped to complete the card.

Monday, September 19, 2022

Halloween Manor

I hadn't used my Cricut recently, and when I saw the 3D Manor houses on Cricut Design Space I knew I needed to make one.  There is one for Valentines Day, Christmas and Halloween.  I decided to make the Halloween one! I added some flickering led lights for additional "spookiness". 


Monday, September 12, 2022

Birdhouses from Northwoods Rubber Stamps

I finally figured out how to use the small birdhouse stamps from Northwoods Rubber Stamps.  Three of them fit perfectly on a mini slimline card!

I use the following for the card:

  • Northwoods Rubber Stamps - Round Birdhouse in Circle C10011, Wood Birdhouse in Circle C10012, Chickadee Birdhouse in Circle C10013
  • Gina K - Summer Silhouettes stamp set (for the sentiment)
  • Memento - Cottage Ivy Ink
  • Gina K - Master Layouts 7
  • Gina K - Applemint and Obsidian Ink
  • Gina K - Petite Flourish Background Stamp
  • Prismacolor Color Pencils
To make the card, the birdhouses were stamped using Obsidian ink.  These were then colored using Prismacolor Pencils.  A mat was cut for the images using green card stock.  The background was stamped using the Petite Flourish Background stamp and Applemint ink.  This was then cut with the smallest of the rectangles from Master Layouts 7.  The circles were cut using the largest circle die from Master Layouts 7.  The birdhouse images were added and the sentiment stamped to complete the card.

Monday, September 5, 2022

Leafy Birthday card

I'm still making mini slimline cards.  I really like the size.  These cards were very easy to put together, a few die cuts and a stamp!

I used the following for the cards:

  • Gina K - Wild Blossoms Stamp Set
  • Gina K - Watercolor Floral paper pad
  • Gina K - Fresh Asparagus Ink
  • Gina K - Master Layouts 7
  • Tim Holtz - Skeleton Leaves Dies
To make the cards, I cut the patterned paper from the Watercolor Floral paper pad using Master Layouts 7.  I also cut the green mats.  The leaves were cut using the same color green card stock as the mat.  I cut a piece of white paper to fit in the center.  The patterned paper was added to the mat, the entire piece added to the card base.  The white rectangle added, followed by the leaf.  The sentiment was added to complete the card.


Monday, August 29, 2022

My first mini-slimline card

I like making mini-slimline cards!  I think that I'll be adding this size to the cards I make. For my first card, I used Gina K products.  Here is the card:

I used the following for the card:

  • Gina K - Master Layouts 7 Dies
  • Gina K - Summer Silhouettes Stamps
  • Gina K - Bodacious Blooms Stencil
  • Gina K - Grass Green, Fresh Asparagus, Black Onyx, Light, Medium and Dark Carnation
To make the card, I cut the white card stock (and associated black mat) using Master Layouts 7.  I added the lightest inks using the first stencil.  Using the second stencil, the medium color inks were added.  Using the third stencil, the darkest inks added.  The sentiment was then stamped in black.  The panel was then added to the black mat, and the entire piece added to the card base to complete the card

Monday, August 22, 2022

Happy Birthday, using the Carved Wood Technique

I saw a Gina K video where she used a "carved wood" technique.  It was interesting, so I gave it a try for this card.  I did use purples instead of browns, and it made it more interesting.  Rhinestones were added to the card, and in person, its very sparkly (but it didn't photograph well). Here is the card:

I used the following for the card:

  • Gina K - Lovely Lavender, Wild Wisteria Ink
  • Gina K - Birthday Trio dies
  • Gina K - Angel Aura Rhinestones
  • Elizabeth Craft Designs - Flower Mosaic Embossing Folder
To make the card, I cut a  piece of white card stock and and associated black mat.  The white piece of card stock was scored every 1/2 inch, and Lovely Lavender was added directly from the ink pad, and it looked like a piece of purple wood!  The panel was then embossed with the embossing folder.  Wild Wisteria ink was then added.  The sentiment was cut using the Birthday Trio dies and added to the card using foam tape.  The Rhinestones were added to complete the card.

Monday, August 15, 2022

Zinnia Birthday card

Flowers are always great on birthday cards.  This one is from a Gina K Designs stencil. The flower is so large that it doesn't even fit fully on an A2 card.  


I used the following for the card:
  • Gina K Designs - Light, Medium and Dark Carnation Ink, Light and Medium Spruce Ink, White Pigment Ink
  • Gina K Designs - Zinnia Stencil
  • Gina K Designs - Happy die, Master Layouts 2
  • Gina K Designs - Summer Silhouettes
  • Stampendous - Detail White Embossing Powder
  • Honey Bee - Sentiment Banner Dies
  • Pretty Pink Posh - Tutti-Frutti Sequins Mix
To make the card, I cut a piece of white card stock with Master Layouts 2.  The associated black mat was also cut.  The stencil was then placed on the paper, and with blending brushes, the Light Carnation ink was added to the entire flower. Medium Carnation was then added the the center 2/3rds, followed by the Dark Carnation in the very center.  The leaves were then added using the Light and Medium Spruce.  This panel was attached to the black mat, and the entire piece added to the card base.  "happy" was cut is black and added to the card.  "Birthday" was stamped in white, then embossing powder added, heat set, and cut with a banner die. This was added to the card with foam tape.  The sequins were then added to complete the card.

Challenges: Simon Says Stamp Monday Challenge: Fun With Stencils


Monday, August 8, 2022

Rosy Birthday Card

I had want to make some Distress Oxide backgrounds, I made several, but because of stamping errors, this was the only one that made it to become a card!


To make the card, I used:

  • Versafine - Black Onyx Ink
  • Distress Oxide - Squeezed Lemonade, Carved Pumpkin, Kitsch Flamingo
  • Prismacolor Pencils - Red and Green
  • Gina K Designs - Master Layouts 2 
  • Gina K Designs - Summer Silhouettes stamp set
  • Gina K Designs - Wild Roses stamp set
  • Gina K Designs - Soft White Pearl Mix
To make the card, I first created the background, blending the 3 colors of Distress ink.  Using Versafine ink, the rose image and the sentiments were stamped.  Using just 2 colored pencils - red and green - the rose image was colored.  The panel (and associated black mat) was cut using Master Layouts 2.  The panel was attached to the mat, and the entire piece to the card base.  3 small pearls were added under the sentiment to complete the card.

Monday, August 1, 2022

Fishy Birthday Card

Here is the card I made for my husband this year.  Masculine cards are hard for me to make, and I just had to add a few sequins, I don't think he will mind!

For the card I used:

  • Altenew - Birthday Greetings stamp set
  • Stampin' Up - By the Tide stamp set
  • Hero Arts - Script Bold Prints background stamp
  • Gina K Designs Ink - Sea Glass, Turquoise Sea, Tranquil Teal
  • Pretty Posh Pink - sequins
  • Masking Paper
To make the card, I tore a piece of masking paper and added it to the top and bottom of a piece of white card stock.  Using a blender brush, I added the Sea Glass Ink.  I then stamped the script using Turquoise Sea.  The remaining images are from the By the Tide set and they were stamped in Tranquil Teal.  The masking paper was then removed, and the sentiment added.  I masked the panel using Turquoise Sea paper.  After adding the panel to the card base, it needed something else ... so the sequins were added to mimic air bubbles.

Challenges:

Monday, July 25, 2022

Happy Anniversary Butterflies

Here is a cheerful summer anniversary card:


For this card is used:

  • Gina K Designs - Never Lose Hope, Summer Silhouettes stamp sets
  • Gina K Designs - Black Onyx Ink
  • Distress Ink - Lucky Clover, Mermaid Lagoon, Blueprint Sketch
  • Masking Paper
To make the card, I first masked the top and bottom portions of a piece of white cardstock.  Then using blender brushes, I added the distress ink. The masking paper was removed, and the butterflies were stamped.   The sentiment was added.  The image was matted with a piece of black cardstock and the entire piece added to the card base to complete the card.


Monday, July 11, 2022

Happy 8th Birthday.

 Here is a card I made for an 8 year old in our family.  


For the card I used:

  • Gina K - Large and Small Oval dies
  • Gina K - Sandy Beach, Kraft, Sea Glass, Blue Lagoon Ink
  • Hero Arts - Number Candles stamps and dies, Coloring Layering Cupcake stamps and dies
  • Altenew - Frosty Pink, Cotton Candy Ink
  • Wink of Stella - Clear
  • Glossy Accents
To make the card, I stamped the cupcake and all its layers with the multiple inks.  Wink of Stella was added to the frosting for a bit of sparkle.  I then cut the cupcake out using the matching die.  The number candle and flame were stamped on colored card stock and cut out with the matching dies.  Glossy Accents was added to the flame and the top part of the candle. I then cut the ovals from white and black card stock.  These were attached, and the cupcake, candle, and flame added to the oval.  The background paper is from Craft Consortium.  This was cut to 3.75 x 5 and matted with black, and added to the card base. The oval piece was then added to complete the card.

Monday, July 4, 2022

Sunny Birthday Card

 Here is a fun and sunny birthday card:


I used the following for the card:

  • CTMH - Joyful Birthday Occasions
  • Recollections - Palm Trees
  • Gina K - Sunshine Stencil
  • Gina K - Black Onyx, Wild Dandelion, Tangerine Twist inks
  • Gina K - Master Layouts 2
To make the card, I used Master Layouts to cut a piece of white cardstock (and the associated black mat).  Using the stencil and blending brushes the sun was added.  I then stamped the palm tress and sentiment.  The image was then added to the mat and the entire piece was added to the card base to complete the card.

Monday, June 27, 2022

Stampin' Up Fathers Day Card

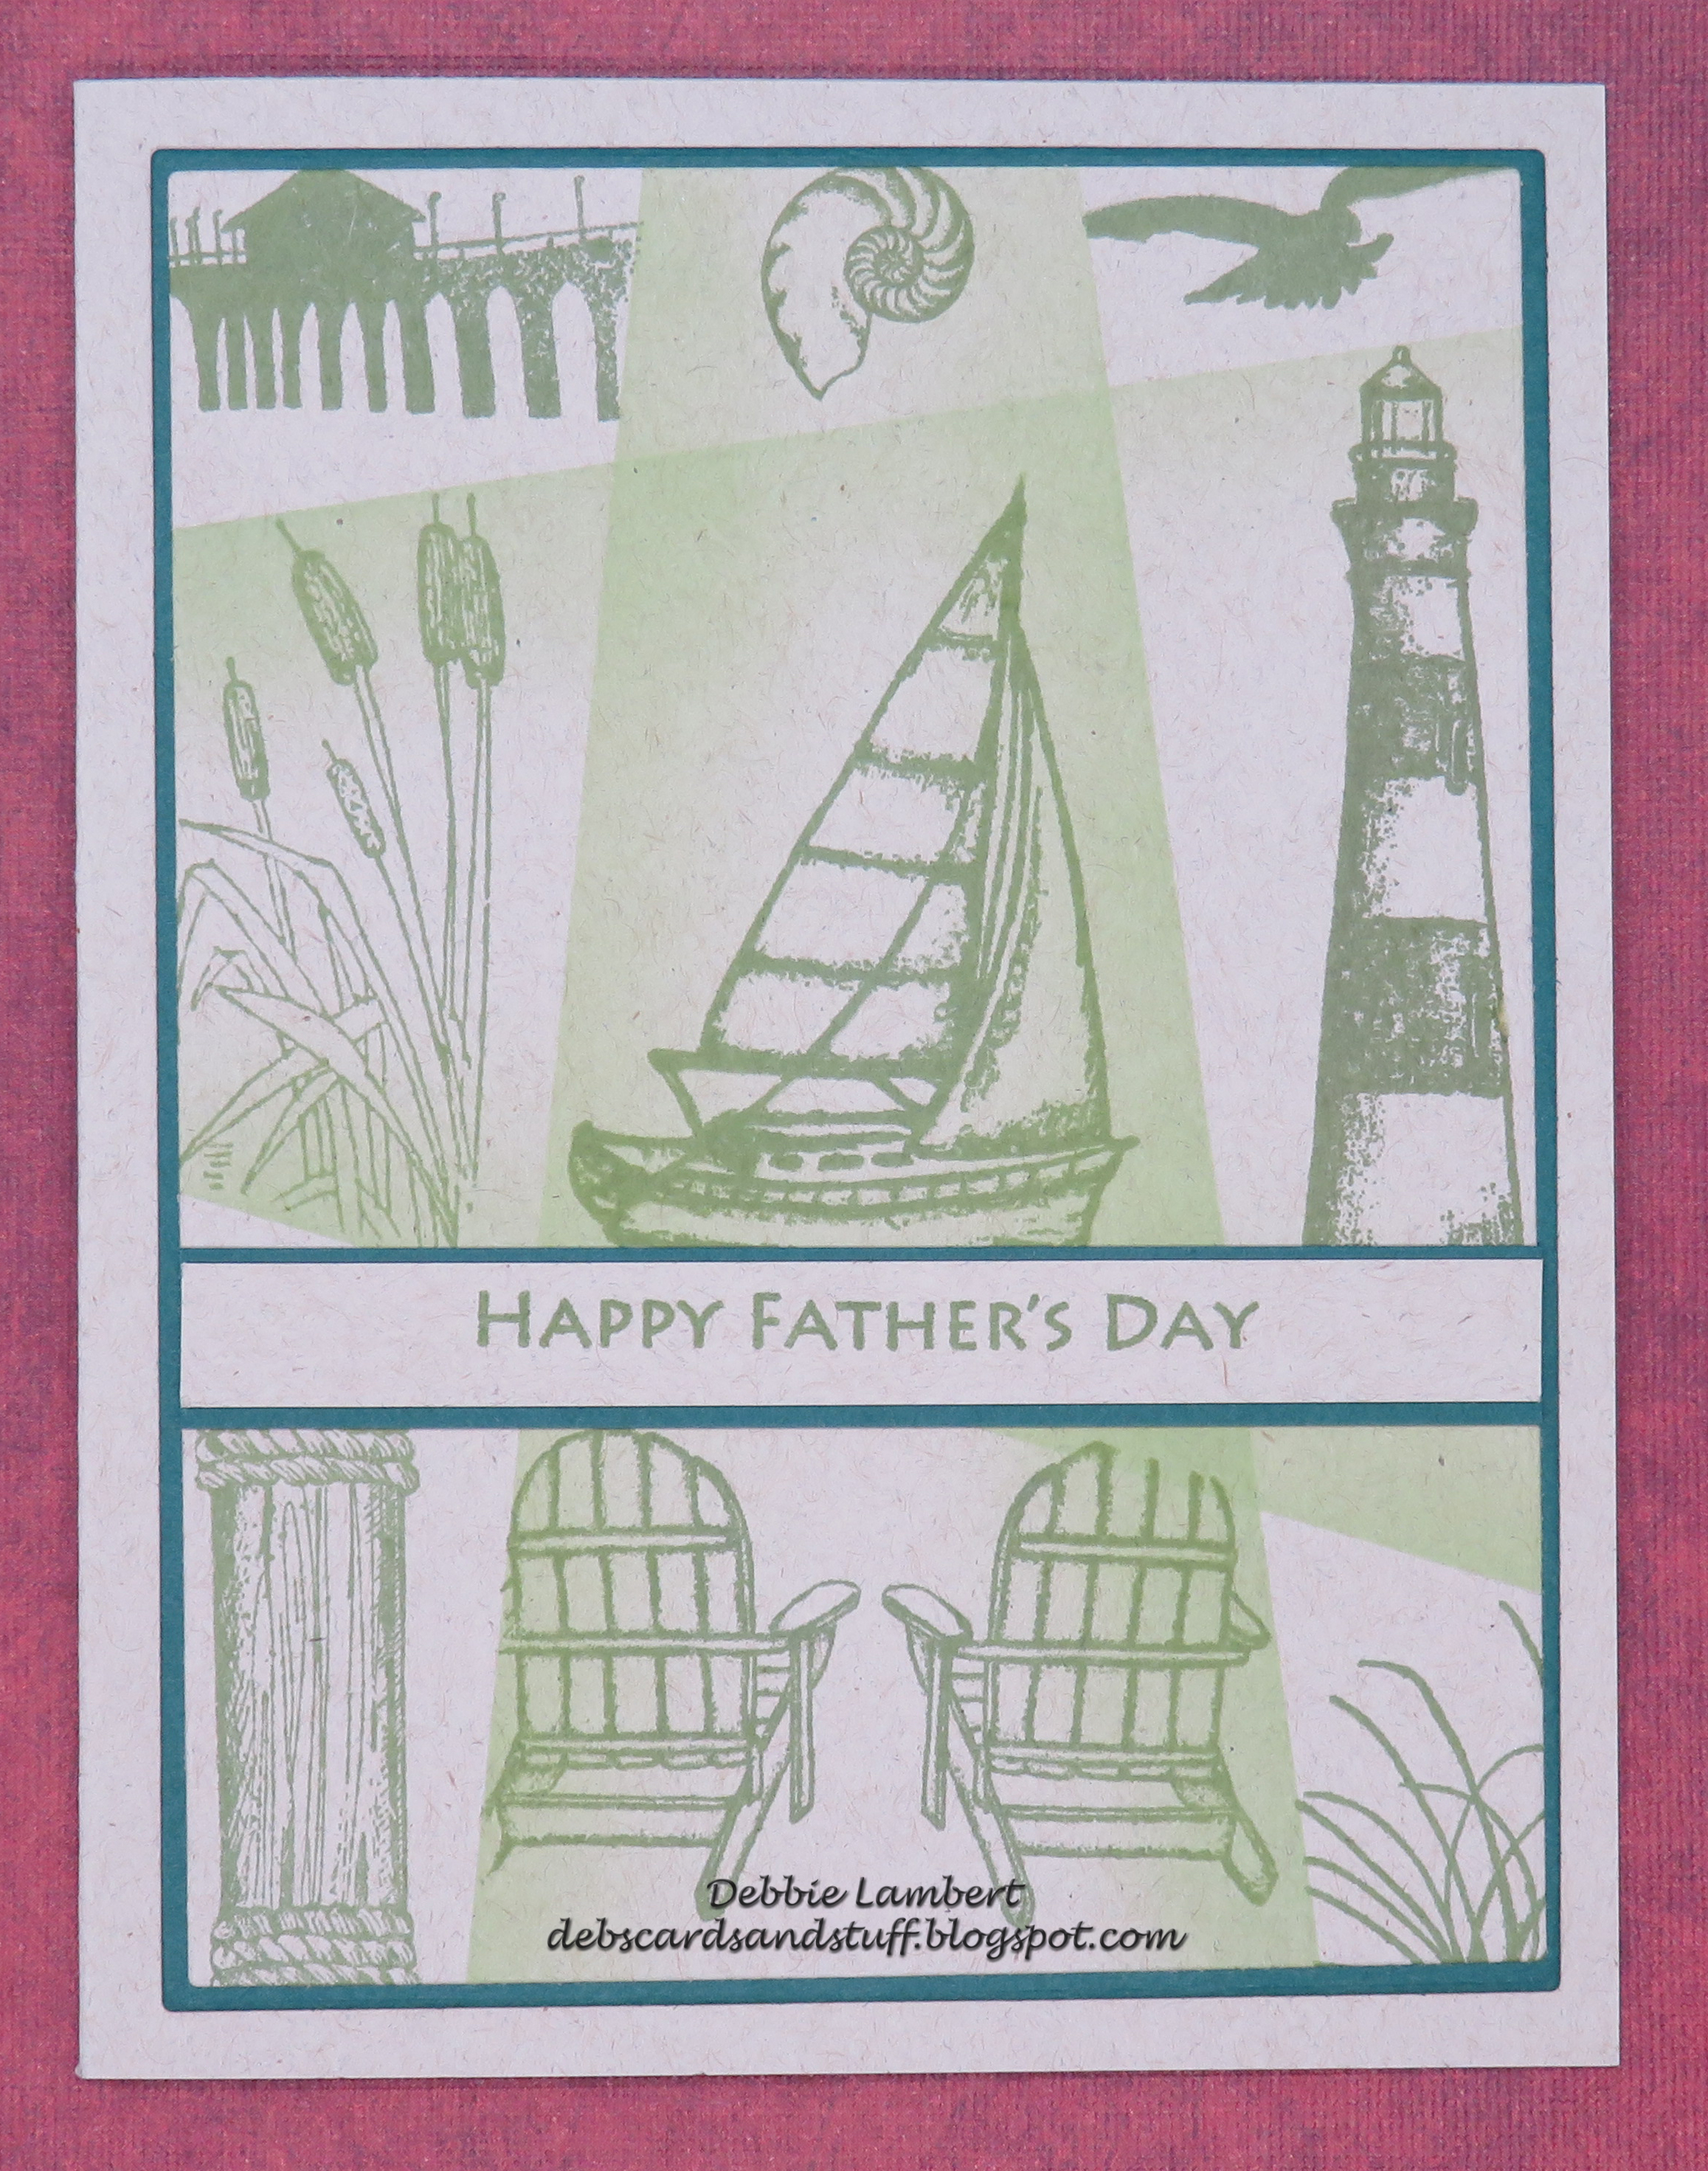
When I first started making cards, I didn't know how to do many of the techniques.  I pinned cards ides to Pinterest figuring one day, I'll learn how to make the cards.  One card I really likes used a stamp set from Stampin' Up.  I got the set - of course.  I made some cards using it, but none were like the one card I like and had originally pinned.  So for Fathers Day, I finally got the set out and recreated the card I had originally pinned.  Here it is:


 To make the card, I used:

  • Stampin' Up - Wetlands
  • Gina K - Charcoal Brown, Kraft, Tranquil Teas, Ocean Mist Inks
  • Gina K - By the Sea 2
To make the card,  I trimmed a piece of white card stock to 3.75 x 6, and masked out the square.  In the square, I then added the ink, using blending brushes.  While the area was still masked, I stamped the birds.  I removed the mask, and then stamped the grasses.  The sentiment was then added.  I added a mat to the image and then added the entire piece to the card base to complete the card.

Monday, June 20, 2022

Retiform Technique

A few weeks ago, I saw a Gina K YouTube video where she did a technique called Retiform.  I gave it a try for some Fathers Day cards and this is how they came out:

To make the cards I used the following:

  • Gina K - Vertical Greetings, Wetlands 2, By the Sea 2 
  • Seaside Stamping Ink - Beach Stories Too 
  • Stamping Up - By the Tide
  • Local King Rubber Stamps - Seaside, Rough Rider
  • Close To My Heart - Enjoy Life
  • Tim Holtz - Hear and There
  • Hero Arts - Sandstone, Cocoa Ink (Brown Card)
  • Gina K - Fresh Asparagus, Grass Green (Green Card)
  • Gina K - Stormy Sky, Soft Stone (Gray Card) 
  • Gina K - Blue Denim, Powder Blue (Blue Card)
  • Gina K - Master Layouts 1
To make the cards, I masked areas and using a blending brush added ink to create the background areas.  This was done with the lighter of the ink colors.  I then stamped the images from the various stamp sets into the areas using the darker colored inks making sure to mask the area first.  The image was then cut (along with the mat) using Master Layouts 1.  The image was added to the mat, and then the entire piece to the card base.  The sentiment was stamped, matted and added to the card.

Here are some close ups of the cards:


Monday, June 13, 2022

Cricut Graduation Card

I needed another graduation card, and found a Cricut "cutaway" image that I could use.  I love the look of this card:


For this card, I used a silver pen for the print portion of the card.  The image was then backed with holographic paper, and matted in black.  This was then added to the card base to complete the card.

Monday, June 6, 2022

Hero Arts Birthday card

One of my favorite card kits from Hero Arts was the July 2019 kit - Lakeside.  I've made several cards with this kit and here is another one:


For this card I used:

  • Hero Arts - July 2019 Card Kit Lakeside (Stamps, Dies, Inks, and Paper)
  • Hero Arts - Time for Fun (Stamps and Dies)
  • Gina K Designs - Master Layouts 2
  • Gina K Designs - Various Inks
  • Masking Paper
To make the card, I stamped the lighter color tree line, and then the darker layer.  This was then masked, and the mountains stamped.  The mountains were masked and the sky added.  The water was then added by using blender brushes and several different color blue inks.  I stamped the pier and grasses on white card stock and cut with the associated dies and added.  The boys were stamped next using black ink.  The sentiment added.  The entire piece was then cut with the stitched die from Master Layouts 2. The piece was matted with back and added to the card base to complete the card.


Monday, May 30, 2022

Cricut Birthday card

Cricut now has "cutaway" cards.  These images have both a print and cut portion.  I used one of the predesigned images for this card:

I used a silver pen for the print portion, and the backed the card with a piece of holographic paper.  This was then matted in black and added to a white card base.  

Monday, May 23, 2022

Graduation Cap and Gown Cards.

It is graduation season, while I usually don't need any cards, this year I need several.  Since I rarely make graduation cards, I don't have any graduation related stamps.  While looking on Pinterest, I found a card I knew I could make (see the pin here).  What was even better, was there was a blog post (see here) and a video (see it here).  I totally copied what was there (one card even has the same colors!).  

This is such a great design!  

Here are the cards:


The measurements I used:

Card base was 5.5 x 8.5, with score lines at 2 1/8 from each end. The cap - 3 inches.  The white portion of the gown - 3 inch square, cut into quarters.  The tassels were made from matching DMC floss.  Ribbon added between the white and colored portion of the gown. The numbers cut from my Cricut.

Monday, May 16, 2022

A Foiled Birthday Card

I love using foil for cards, and this birthday card in no exception! I just wish it was easier to photograp.


For this card I used:
  • Therm-O-Web - Deco Foil - Rainbow Shattered Glass
  • Therm-O-Web - Toner Sheets
  • Gina K Designs - Birthday Trio, Master Layouts 2
  • Confetti Background
To create the card, I printed the confetti background using a laser printer.  Using my Minc machine, I added the foil.  This was then cut using Master Layouts 2 (along with the black mat).  The two pieces were attached and added to the card base.  Using the Toner Sheets, I cut the Happy Birthday, and added the foil using my Minc.  The shadow layer for the sentiment was cut using black cardstock.  The foiled Happy Birthday was added to the shadow layer, and the entire piece added to the card base using foam tape to complete the card. 

Monday, May 9, 2022

Using a Snowflake stencil for a Spring Anniversary card! (Gina K)

Who says snowflakes are only for winter!  Using rainbow colors and a bit of Glitz Glitter Gel can transform a snowflake image.  


For this card, I used the following:

  • Gina K Designs - Snowflake Mandala Stencil
  • Gina K Designs Ink - Cherry Red, Tangerine Twist, Wild Dandelion, Luck Clover, Blue Raspberry, Wild Lilac, Black Onyx
  • Gina K Designs- Glitz Glitter Gel - Iridescent
  • Gina K Designs - Master Layouts 2
  • Altenew - Vintage Roses (for the sentiment)
  • Honey Bee - Sentiment Banners

To make the card, the stencil was attached to a white piece of card stock.  Ink was added in rainbow order. This was finished with a layer of Glitz Glitter Gel to give a glittery look to the snowflake (which also made it hard to photograph!).  Once dry the panel was cut using Master Layouts 2 along with the associated black mat.  These two pieces were attached, and then added to the card base.  The sentiment was stamped and then cut with the banner die.  This was added to the card with foam tape to complete the card.

Monday, May 2, 2022

Cricut Anniversary Cards

I needed a few Anniversary cards, so I decided to get out my Cricut to make some!

The first card is based on a card made by Natasha Foote (see the video here).  I loved the layout she used.  Using my Cricut, I was able to create the Heart and Banner.  I used the text feature to create the sentiment.  The heart was cut 4 times and glued together for additional height.  The strips were cut from various paper. I added a few dew drops (from Honey Bee) to complete the card.

For the next card, I cut the heart (both layers) from my Cricut.  I glued them together and added them to the card base.  The sentiment is from one of my favorite stamps sets from Picket Fence Studios, "Words to Say Happy Anniversary".


Wednesday, April 20, 2022

So many cards (so far) with the new Gina K kit Watercolor Spring

When I saw the newest Gina K Designs kit, it was one that I knew I needed to have!  I knew that I would be making a lot of cards with it, and I was right!  I've made 8 so far, and have only touched the paper end ephemera!


I used the following for the cards:

  • Gina K Designs - Watercolor Floral Paper and Ephemera from the Watercolor Spring Kit
  • Gina K Designs - Large and Small Oval Dies, Large and Small Circle Dies, Master Layouts 1, Master Layouts 2,  Master Layouts 4
  • Gina K Designs - Black Onyx Ink
  • Gina K Designs - Wild Blossoms (Happy Birthday)
  • Picket Fence Studios - Words to Say (Happy Anniversary)
  • Close To My Heart - Framed Stamp of the Month (Mothers Day)
To make the cards,  I first die cut all of the pieces. From Master Layouts 1 - 4 white rectangles, with the associated black mats.  From Master Layouts 2 - 4 white rectangles, with black mats.  From Master Layouts 4 - 4 white flag shapes and associated black mats.  From the Small Oval set - 4 of the medium ovals in white and from the Large Oval set - 4 of the medium ovals in black. From the Small Circle set - 4 of the medium circles in white and from the Large Circle set - 4 of the medium circles in black.   The flower strips were cut from the Watercolor Floral paper with a length to fit and a width of 1.75 inches.  An associated black mat was cut for these pieces as well.  The white rectangles were matted with the black pieces and the flower strips added.  The ovals were added to half the cards, and the circle with flag shapes were added to the remaining cards.  These were then added to card bases.  The ephemera and sentiments were added to complete the cards.