Pages

Showing posts with label Deco Foil. Show all posts

Friday, July 19, 2024

Using leftover foil for another Birthday Card!

I had to use the leftover foil from a card I made a few weeks back,  Since the foil could be added to black toner sheets, I did that to make the background of this card.  (Now I just need to learn how to take a picture of a foiled card without getting a reflection in the foil!)


I used the following for the card:
  • Gina K Designs - Wetlands 2 Stamp set
  • Gina K Designs - Master Layouts 1
  • Wink of Stella - Gold
  • MFT - Black Licorice Ink
  • Therm-o-web - Gold leftover foil from foiling the Gina K Thick Brush Stencil-Mate

To make the card, I added the foil to the Black Toner sheet using my Fuse Machine.  This was then die cut using Master Layouts 1 (along with the black mat).  These were added to the card base. The image and sentiment were stamped on white paper and then manually cut to size and added to a black mat.  These were added to the card.  Wink of Stella was added to the wings of the dragonfly to add a bit of shimmer.

Friday, July 12, 2024

Another Foiled Birthday Card!

Here is another card made with a Stencil and associated Stencil-Mate

I used the following for the card:

  • Gina K Designs - Lush Leaves Stencil and matching Stencil-Mate
  • Gina K Designs - Tranquil Teal, Lucky Clover, Wild Wisteria Ink
  • Gina K Designs - Master Layouts 1
  • Gina K Designs - Birthday Cheer Poly-glaze
  • Therm-o-web - Emerald Watercolor and Champagne Deco Foil

To make the card, I foiled the Stencil-Mate with the Emerald Watercolor foil.  Then using the stencil, the various inks were added.  The image was then cut using the Master Layouts 1, along with the associated mat (in this case I used blue foil paper).  The sentiment was cut using the oval from Master Layouts 1 (along with the blue foil mat).  The sentiment was foiled using Champagne Foil.  The pieces were assembled and added to the card base to complete the card. 

Sunday, July 7, 2024

Foiled Happy Birthday (Gina K)

A while back I got some of the Stencil-Mates from Gina K.  I picked the ones that matched stencils I already had.  I liked that the Stencil-Mate would allow you to add foil around the edges of the stenciled image.  Here is a card I mage with the Thick Brush Stencil and Stencil-Mate:


I used the following for the card:
  • Gina K Designs - Thick Brush Stencil and matching Stencil-Mate
  • Gina K Designs - Tranquil Teal, Lucky Clover, Wild Wisteria Ink
  • Gina K Designs - Master Layouts 1
  • Gina K Designs - Birthday Cheer Poly-glaze
  • Therm-o-web - Gold and Champagne Deco Foil

To make the card, I foiled the Stencil-Mate with gold foil.  Then using the stencil, the various inks were added.  The image was then cut using the Master Layouts 1, along with the associated mat (in this case I used blue foil paper).  The sentiment was cut using the oval from Master Layouts 1 (along with the blue foil mat).  The sentiment was foiled using Champagne Foil.  The pieces were assembled and added to the card base to complete the card. 


Monday, August 21, 2023

Using Waste Foil

I recently purchased the Lush Leaves  Stencil Mates from Gina K Designs.  i foiled the lush leaves and just fell in love with the waste foil!  I knew I needed to make a card with it.

I used the following to make the card:

  • Therm O Web - Deco Foil Emerald Watercolor Toner Foil
  • Glitter Ritz - Cool Highlight Micro fine glitter
  • Gina K Designs - Master Layouts 1
  • Gina K Designs - Black Onyx Ink
  • Gina K Designs - Enjoyable Greetings
  • Sookwang Double Sided Tape
To make the card, I added the Sookwang tape to a piece of  white card stock.  Once the tape was exposed, I carefully added the waste foil.  The foil backer sheet was removed.  Since the leaf outlines were still exposed tape, I covered them with micro fine glitter.  This piece was then cut with ML 1, along with a gold mat.  These were then added to a green card base.  The center oval, and mat were also cut with ML 1 and attached to the card.  The sentiment was then stamped to complete the card.

Sunday, March 19, 2023

Radiant Roses - Foiled

I'm just loving the Radiant Roses Layering Bundle from Gina K Designs.  There are just so many options available with this bundle.  For my first card, I decided to use just the layering stencils and foil. (and I got a decent picture of the foiled images!)


I used the following for the cards:

  • Gina K Designs - Radiant Roses Layering Stencils
  • Gina K Designs - Bold Bloom (for the sentiment)
  • Gina K Designs - Black Onyx Ink
  • Gian K Designs - Master Layouts 1
  • Gina K Designs - Paper - Kraft, Black and Plum Punch
  • Deco Foil - Transfer Gel
  • Deco Foil - Emerald Watercolor and Amethyst Watercolor foils
To make the card, I added the deco foil gel through one of the layers of the stencil.  Once it was dry, the area was foiled.  The next layer was then aligned and deco foil gel added. Again, once dried, the area foiled.  The entire panel and the black mat were then cut with ML 1.  These were then added to the plum card base.  I kept things simple, and added a small sentiment to the bottom corner to complete the card.


Monday, May 16, 2022

A Foiled Birthday Card

I love using foil for cards, and this birthday card in no exception! I just wish it was easier to photograp.


For this card I used:
  • Therm-O-Web - Deco Foil - Rainbow Shattered Glass
  • Therm-O-Web - Toner Sheets
  • Gina K Designs - Birthday Trio, Master Layouts 2
  • Confetti Background
To create the card, I printed the confetti background using a laser printer.  Using my Minc machine, I added the foil.  This was then cut using Master Layouts 2 (along with the black mat).  The two pieces were attached and added to the card base.  Using the Toner Sheets, I cut the Happy Birthday, and added the foil using my Minc.  The shadow layer for the sentiment was cut using black cardstock.  The foiled Happy Birthday was added to the shadow layer, and the entire piece added to the card base using foam tape to complete the card. 

Tuesday, October 27, 2020

Autumn Greeting!

I like Autumn.  I like Autumn so much that I have a large collection of stamps and dies for fall that are not Halloween related.  Here is a card that I made using those supplies:


To make the card, I used the following:

  • Gina K - Foilmates - Autumn Leaves
  • Deco Foil - Amber Watercolor
  • Tim Holtz - Metallic Kraftcore Paper
  • Tim Holtz - Skeleton Leaves Dies
  • Versa Mark
  • Stampendous - Detailed Black Embossing Powder
  • Gina K - Master Layouts 1
To make the card, I foiled the Autumn Leaves paper with the Amber Watercolor foil.  This was then trimmed to size using the smaller of the Master Layouts dies.  The foiled image was matted with black card stock cut to size using the larger of the Master Layouts dies.  This was then added to card base.  The leaves were cut from the Metallic paper and added to the card.  The greeting was then stamped on a piece of the metallic paper with Versa Mark, embossing powder was added and heat set.  This was then matted with black and added to the card completing the card.

Monday, August 10, 2020

A Hamilton Birthday Card

My niece is obsessed with Hamilton.  So when Cathy Zielske provided a printable card, with the Hamilton image, I knew I needed to use it somehow for a card.  

I really wanted to use foil for the gold  background.  So, using Adobe Photoshop Elements, I reversed the colors in the image, added the happy birthday, and printed it on black paper.  I then foiled the image and added a black mat, and placed it on the card base to complete the card.


Thursday, April 9, 2020

Easter Egg Card (Elizabeth Craft Designs and Foil)

I've had the Easter Egg dies from ECD for a while.  I finally decided to use them this year for this card:

I used the following to make the card:
  • Elizabeth Craft Designs - Easter Eggs, Outdoor Edges dies
  • Deco Foil - Rainbow
  • Toner Sheets
  • A very old Happy Easter stamp
  • Altenew - Warm Sunrise Ink

To make the card, I cut the solid egg shapes from the toner sheet, and added the foil using my Minc machine.  The detail portion of the eggs was cut from black foil paper and added to the solid ovals.  I added several layers of grass (cut from one of the Outdoor Edges dies) to a piece of white card stock (trimmed to 3.75 x 5).  The eggs were then added tucked behind one or more layers of the grass.  The sentiment was ten stamped.  The entire panel was mounted to a piece of colored card stock cut to 4 x 5.25.  This was then added to the card base to complete the card. 

Monday, January 13, 2020

More Foiled Birthday Cards

I while back, I made some foiled birthday cards similar to these. I quickly needed more cards, so I made more using the same basic design.


I used the following for the cards:
  • Altenew - Leaf Burst Stencil
  • Deco Foil - Transfer Gel
Top Card:
  • Deco Foil - Rainbow Shattered Glass Foil
  • Clearly Besotted - Tiny Type Stamp Set
  • Versamark
  • Stampendous - Detail White Embossing Powder
Bottom Card
  • Deco Foil - Emerald Watercolor Foil
  • Ranger - Lily Pad Dye Ink
  • Honey Bee - Sentiment Banner Dies
  • Altenew - Beautiful Inside Stamp Set

To make the cards, I placed the stencil on the paper and added the Deco Foil Transfer gel using a pallet knife.  Once dry, the foil was added using my Minc machine .  Both panels were trimmed to size and added to the card bases.  The sentiments were ten added to complete the cards.


Thursday, October 24, 2019

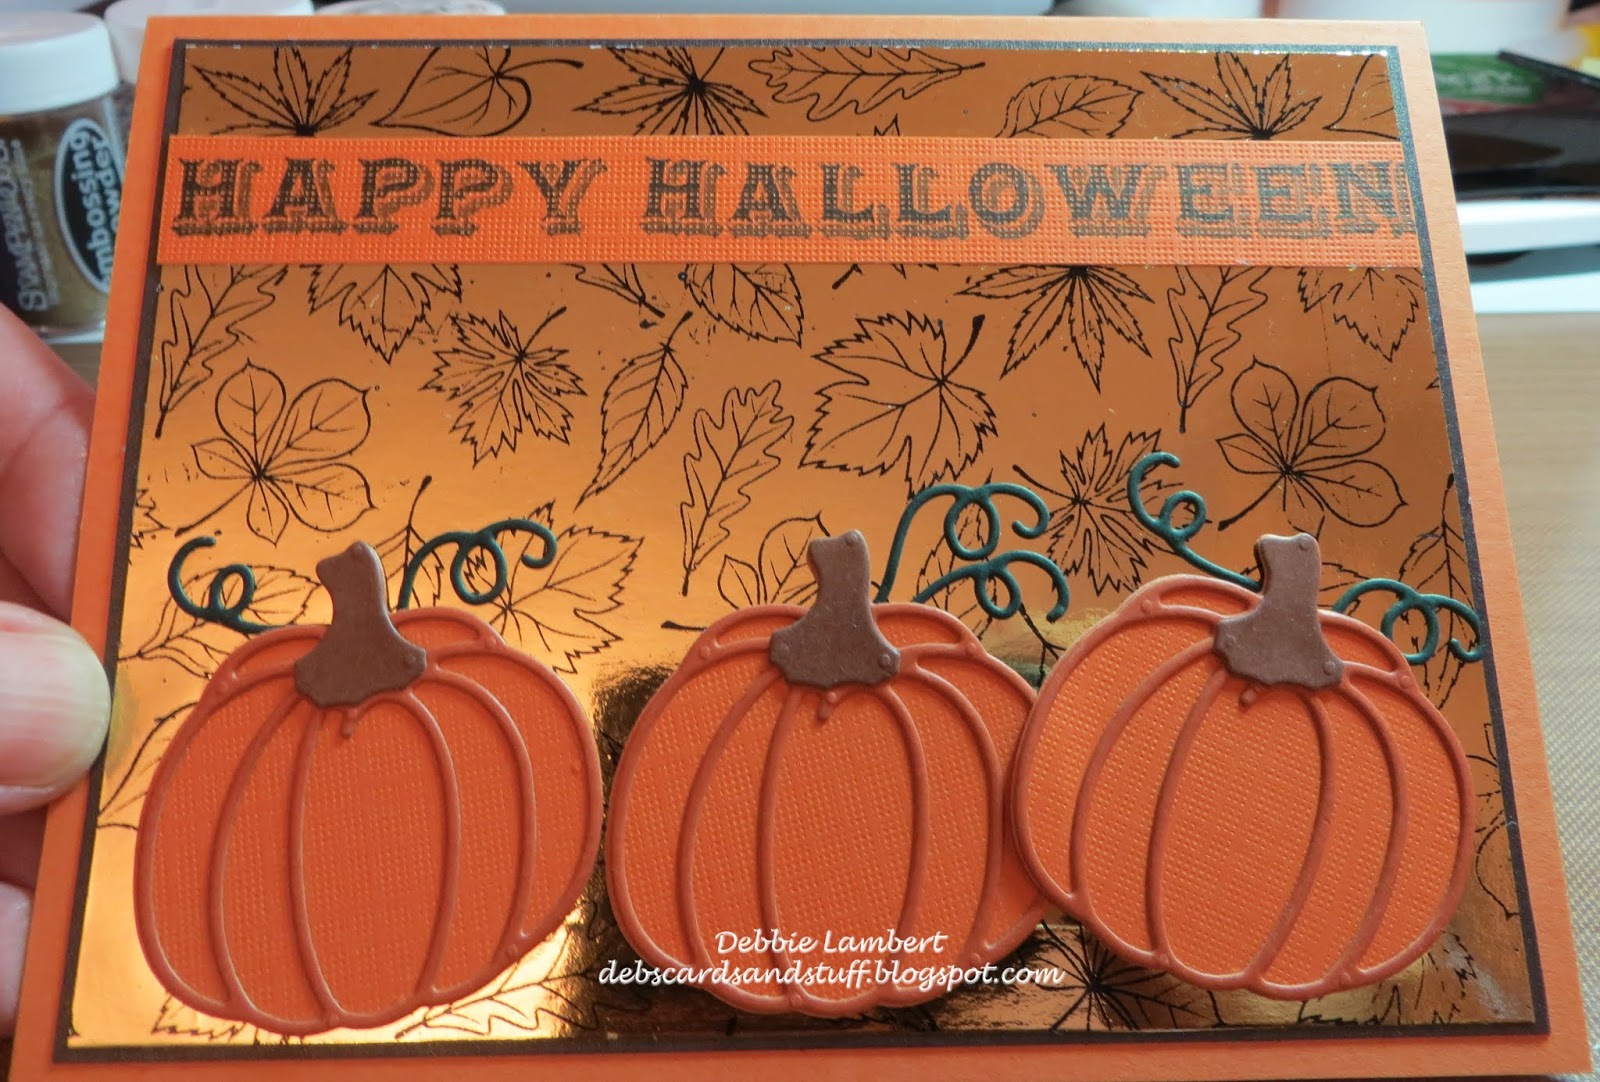
A Pumpkin Halloween Card

I had a left over piece of foil, and it inspired this card:

I used the following for the card:

  • Elizabeth Craft Designs - Pumpkin Die
  • Martha Stewart - Happy Halloween Stamp Set
  • Heidi Swapp Gold Minc Foil
  • Gina K Designs - Foilmates - Leaves
  • Deco Foil Toner Sheets
To make the card, I first cut the pumpkins, layers and assembled them.  The left over foil was added to a toner sheet and run through my Minc Machine.  The pumpkins were added to the foiled panel.  The sentiment was stamped on a strip of orange paper and added to the foiled panel.  The entire panel matted with black card stock and added to an orange card base to complete the card.

Thursday, October 17, 2019

A Ghost filled Halloween Card

I collect foil.  I admit it, I am a foil hoarder.  I think I have more foil than I will ever use!  One of the foils I found in my collection is not all that opaque.  It was perfect for the ghosts on this card:


I used the following for the card:
  • A Colorful Life - Ghosties Stencil
  • Creative Vision Stamps - Foilables Mini Series - Hocus Pocus
  • Gina K - Sweet Mango Foil
  • Deco Foil - Opal
  • Deco Foil - Transfer Gel
To make the card, the stencil was placed on a piece of black card stock.  The transfer gel was added.  Once dry, the opal foil was added, and run through my Minc machine.  The Hocus Pocus foilables were foiled with the Sweet Mango foil, and added on top of the ghosts.  The panel was then added to an orange card base to complete the card.

Entered in the Simon Says Stamp Wednesday Challenge: Halloween

Monday, August 12, 2019

Golden Anniversary Card

Here is a card I made for a friends 50th Wedding Anniversary.  For this card, I knew I needed to use a lot of gold.  So for this card, foil and gold embossing powder were needed!


I used to following for the card:

  • Deco Foil - Champagne Foil, Toner Sheets
  • Gina K Designs - Heart Circle Die, Large Single Stitch Circle dies, Wish stamp set
  • Picket Fence - Words to Say Happy Anniversary stamp set
  • VersaMark
  • Stampendous - Detail Gold Embossing Powder


To make the card, I cut the Heart circle from a Toner Sheet.  This was then foiled with the Champagne foil and added to the card base.  The white circle was cut using one of the circle dies.  The bottle and glasses are from Words to Say Happy Anniversary stamp set.  These were stamped with Versmark, Gold Embossing Powder added and heat set.  I then used the curlicues are from the Wish stamp set, and were also stamped in Versamark, Gold Embossing Powder added and heat set.  The circle was then added in the center of the heart circle.  The sentiment was added with Versamark, Gold Embossing Powder added and heat set to complete the card.

Monday, June 24, 2019

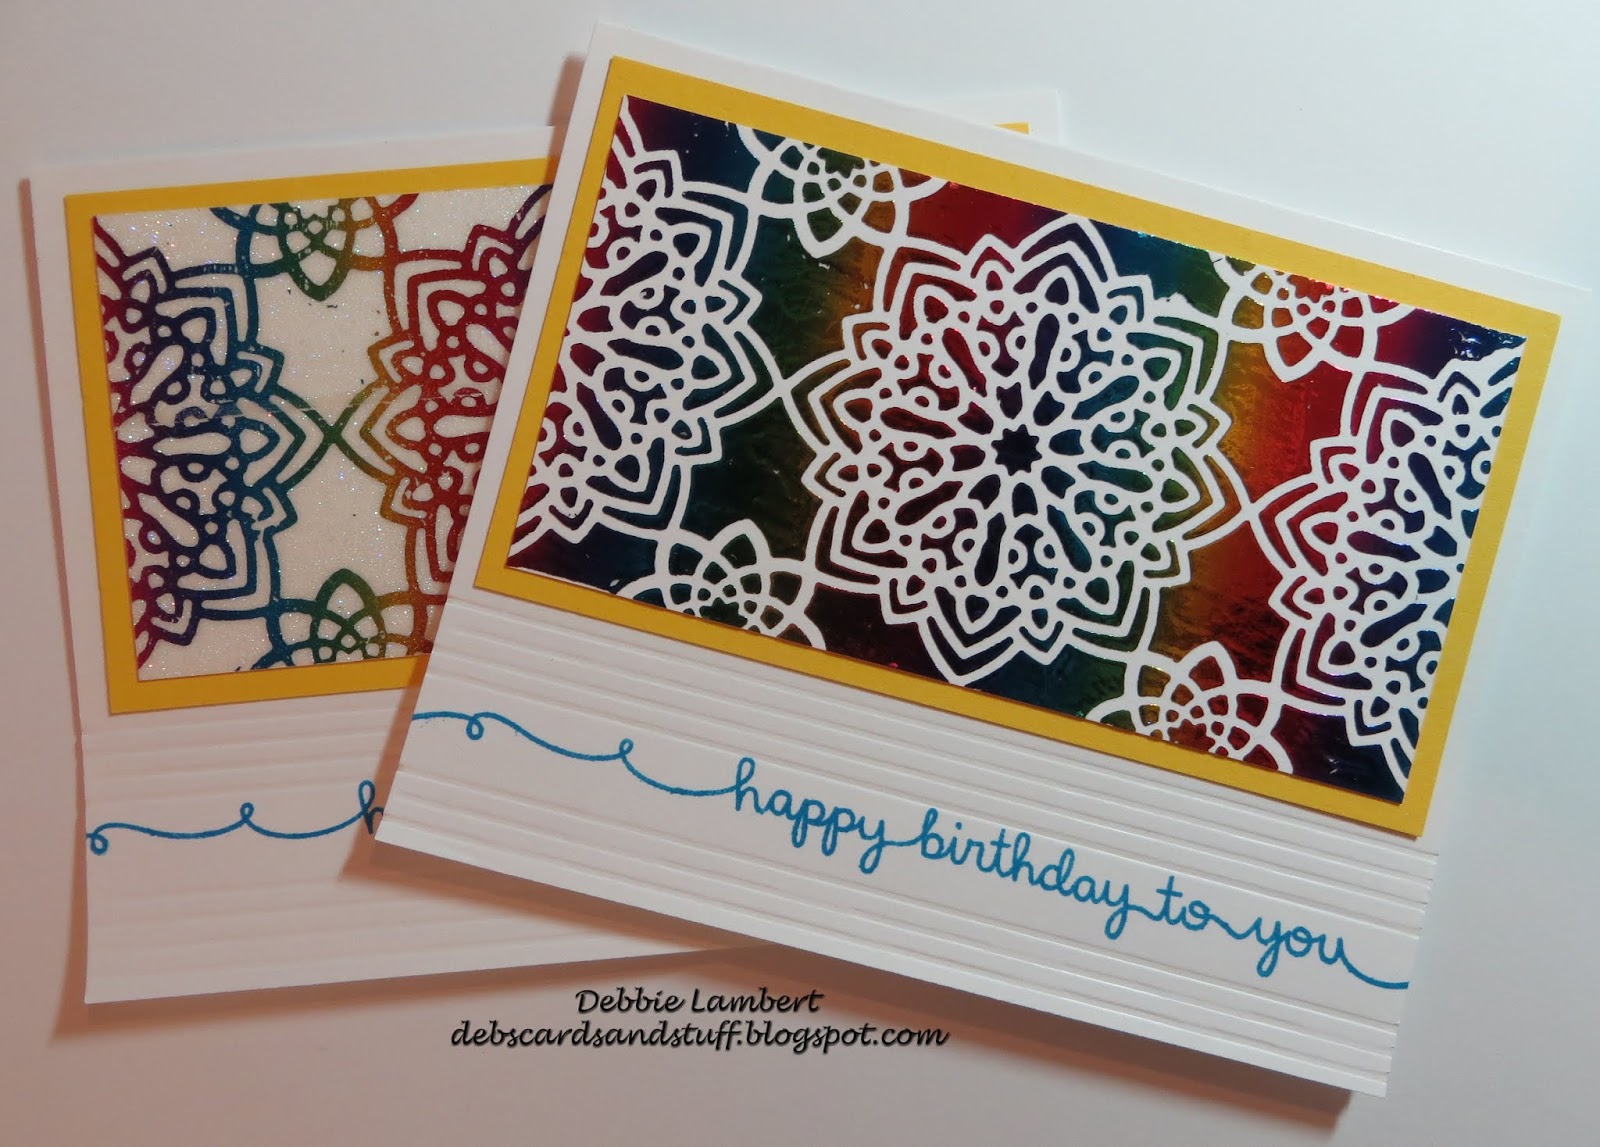
Deco Foil Birthday Cards

I like that I am usually able to get two cards made when I use foil.  The left over is usable!  These two cards are a sample of this:


I used the following to make the cards:

  • Deco Foil Transfer Gel
  • Deco Foil - Rainbow
  • A Colorful Life - Medallions Stencil
  • Sookwang Double Sided Tape
  • Lawn Fawn Scripty Sayings Stamp set
  • Gina K Blue Raspberry Ink
  • Elizabeth Craft Designs  - Cool Diamond Microfine Glitter
For the first card (the one in the front in the picture), the stencil was placed on the card stock, masked to the specific area of the stencil to be used, and the Transfer Gel applied.  The stencil was removed, and once the gel was dry, the foil was added using a Minc machine (any laminator would work).  The panel was trimmed to size, matted with yellow card stock, and added to the card base.  Straight lines were embossed below the panel and the sentiment added to complete the card.

For the second card, Sookwang tape was added to a piece of white card stock.  The left over piece of foil was added to the card stock panel, and I removed the foil backing, exposing the tape in the areas where there was no foil.  Glitter was added and burnished in.  This was then matted with yellow card stock, and added to the card base.  Straight lines were embossed below the panel and the sentiment added to complete the card.

Monday, June 10, 2019

A foiled Birthday Card

I think the theme of my cards for this year will be "Foiled".  I have also found that I am using my stencils more than I had before. I was in need of some birthday cards, that would work for a guy.  I think this colorful one is perfect.   I really like the way this one came out, and want to use this foil again.


For this card, I used:

  • Deco Foil Rainbow Foil
  • Deco Foil Transfer Gel
  • Judkins Square Asanoha Stencil
  • Altenew Beautiful Inside
  • Stampendous Detail White Embossing Powder
  • Versamark
To make the card, the stencil was placed on white card stock, and the transfer gel was added, making sure to only add the gel to a portion of the stencil.  The stencil removed, and once the gel was dry, the foil added using my Minc machine.  The foiled panel was trimmed down, and matted.  This was then added to the card base  The sentiment strip was stamped with Versamark, embossing powder added, heat set, and added to the card.

Monday, June 3, 2019

Anniversary and Birthday card with Deco Foil

Another Anniversary card with Deco Foil, a Stencil and Foil.  This is similar to the card I made last week, bust uses a different stencil.  In some ways I like this one better.


I used the "left over" part of the foil to make another card!  The picture for this card captures the look of the foil really good!.

For the Anniversary card, I used:
  • Deco Foil Transfer Gel
  • Deco Foil Amethyst Watercolor Foil
  • Fnnabair (Prima) - Doily Stencil
  • Laser Printer
  • Gina K Small and Large Circle dies
To make the card, I placed the stencil on a piece of white card stock.  The transfer gel was added and the stencil removed.  Once the gel was dry, the foil was added using my Minc machine.  The panel was added to the card base.  The sentiment was printed using a laser printer, cut using the circle die, foiled and matted and added to the card. This sentiment fit perfectly in the center of the card.

For the Birthday card, I used:

  • The left over foil from the Anniversary card
  • Sookwang tape
  • Elizabeth Craft Designs - Cool Diamond Microfine Glitter
  • Memento - Lulu Lavender Ink
  • Gina K Designs - You Make Me Happy stamp set
  • Gina K Designs - Small Circle Die
To make the card, I covered a piece of white card stock with the Sookwang double sided tape.  After removing the release paper on the tape, I added the left over foil, making sure it was well adhered.  I then removed the backing for the foil. I could have left it, but I wanted to add glitter, to the areas that were did not have foil.  I added the glitter, burnished it in.  The entire panel was matted and added to a card base.  The sentiment was stamped and then cut with the smallest of the circle dies.  This was added to the card as the last step.

The Anniversary card was entered in Simon Says Stamp Monday Challenge (Wedding/Anniversary)   

Monday, May 27, 2019

Anniversary Card with Deco Foil

This year, I have been having trouble keeping up with all of the cards I need.  I've found that creating cards using stencils, transfer gel and foil is quick and provides a great variety of cards.  Recently,  I needed an anniversary card, and here is what I was able to quickly make:


I used the following for the card:

  • Deco Foil Transfer Gel
  • Deco Foil Amethyst Watercolor Foil
  • A Colorful Life - Poinsettia Stencil
  • Gina K - Large and Small Circle dies
  • Laser Printer for the Sentiment
To make the card, the stencil was placed on a strip of paper, and the transfer gel added.  The stencil was removed and once the gel was dried, the foil was added using my Minc machine.  The foiled strip was matted and then added to a card base.  The sentiment was printed on my laser printer, cut out with the small circle die, and then the foil was added.  The circle was matted and added to the card base to complete the card.


Monday, November 5, 2018

Let it Snow - Christmas Card

When I first saw this snowman, I knew I had to have the die,  He is just so cute!  And it uses a lot of scrap pieces of paper!  Here is the card:

To make the card, I used:

  • Deco Foil Transfer Gel
  • Gina K Fancy Foils - Sparkling Silver
  • Creative Expression - Sue Wilson - Let it Snow Die, Build a Snowman Die set
  • Memory Box - Winter Tiny Snowflakes Stencil
  • Lawn Fawn - Stitched Hillside Die
  • Heidi Swapp - Toner Sheets, Red Minc Foil
To make the card, I cut out all of the pieces for the Snowman and Light using a variety of scrap pieces of paper.  I assembled the Snowman and light.  The hill was cut from white paper.  I trimmed a piece of light blue paper, slightly smaller than the card base.  Using the stencil, transfer gel was added.  Once dry, the Sparkling Silver foil was added using my Minc machine.  I cut the Let It Snow from toner sheets, and added the red foil.  All of the pieces were then added to the card base to complete the card.

Monday, October 22, 2018

Foiling with an Altenew Stencil

I love the look of foil on a card - I just wish I could photograph it better.  Here are two cards I made with foil and an Altenew Stencil:


I used the following to make the cards:

  • Altenew Leaf Burst Stencil
  • Deco Foil Transfer Gel
  • Darice Adhesive Strips
  • Ranger Dye Ink - Caribbean Blue
  • Memento - Rose Bud Ink
  • Deco Foil - Lapis Watercolor, Summer Rainbow
  • Close To My Heart - Celebration Stamp Set
To make the cards, I secured the stencil to a piece of white card stock and added the Transfer Gel, and then removed the stencil.  Once the gel was dry, I added the foil using my Minc machine.  The foiled image was then matted and added to a card base.  The sentiments were stamped in an ink that matched the foil and mat.  These were then cut to size, and added to the card using adhesive strips.  

Monday, October 1, 2018

A Pumpkin Halloween Card

For this Halloween card, I used a variety of supplies, and also tried a comparison of my Prismacolor and Faber-Castell Polychromos pencils.  One card was done with the Prismacolor pencils, the other with the Faber-Castell.  Overall, to me the pencils are similar, but I liked the feel of the Polychromos better.  They just seemed to be smoother.

Here are the cards:

Faber-Castell Version:
 Prismacolor Version:

I used the following for the cards:
Gina K - Sweet Mango Foil
Deco Foil - Pumpkin Patch Clear Toner Sheets
Simon Says Stamp - Stitched Rectangles
Hero Arts Infinity Dies - Oval
Prismacolor Pencils
Faber-Castell Polychromos Pencils
Gina K Amalgam Ink
Hampton Art - Halloween Stamp

To make the card, I stamped the image on white card stock with the Gina K amalgam ink and colored with the colored pencils (either Prismacolor or Faber-Castell).  The image cut with the oval dies, and a second oval, slightly larger was also cut as a mat.  I foiled the clear toner sheet.  A rectangle frame was cut with the Stitched Rectangle dies.  The foiled image was cut to fit the black frame, and added to the frame.  The stamped pumpkins were added on top of the foiled image.  This was them added to the card base.