Pages

Tuesday, December 22, 2020

Snowy Penguin Christmas Card

For this card, I used a lot of different dies from different manufacturers.  I am very glad that I have a Gemini Junior, since this card is all die cutting, it saved a lot of time.  


I used the following for the card:
  • Elizabeth Craft Designs - Chilly The Penguin Die
  • Hero Arts - Snowflake Edge Fancy Die
  • Simon Says Stamp - Maryanne Snowflake Die
  • Creative Expressions - Let it Snow Die
  • Memory Box - Winter Tiny Snowflakes Stencil
  • Vicki Boutin - Iridescent Glitter Texture Paste
To make the card, all of the elements were die cut.  I used a dark blue card base, and added the iridescent glitter paste through the Memory Box stencil.  It doesn't show up much in the photo, but the effect was stunning.  Once the glitter paste was dry all of the elements were added to complete the card.
 

Wednesday, December 16, 2020

Peace Love Joy

I got inspiration for this card from several sources, including a post by Kathryn Brown in the Stamp Junkies Facebook group, and a card made by Gina K during one of her Stamp and Chat videos.


I used the following for the card:

  • Gina K Ink - Blue Denim, Blue Raspberry 
  • Gina K - Let it Snow, Simple Snowflakes, Seasonal Greetings
  • Versamark
  • Stampendous - Detailed Silver Embossing Powder
To make the card, I masked the front of a white card base.  Using the Gina K inks, I blended the center area.  Once dry, the snowflakes and sentiment were stamped in Versamark, embossing powder added and heat set to complete the card.

Tuesday, December 8, 2020

A Barbed Wire Christmas Tree?

 Yep, I have a stamp for a Barbed Wire Christmas Tree.  The stamp was a gift from my sister last Christmas, so its only fitting that she will be getting this card this year! This card came together fairly quickly, and looks great on Kraft paper.  Lawn Fawn plaid paper also fit well with the overall design.

I used the following for the card:

  • Texana Designs - Jam'n Barbed Wire Tree
  • Versamark
  • Darice - Green Tinsel Embossing Powder
  • Lawn Fawn - Perfectly Plaid Fall Patterned Paper
To make the card, I stamped the tree with Versamark, added the embossing powder and heat set it.  The image was trimmed down and matted with green card stock.  The plaid paper was cut and matted with green paper as well.  The tree was added to the plaid paper and the entire image added to the card base to complete the card.


Wednesday, December 2, 2020

Christmas Cards using Gina K Master Layouts

I made several cards using all three of the Master Layout die sets from Gina K.  I think that these ended up being one of my more favorite card designs this year!  The sentiment stamps from Tim Holtz fit the style of the paper and cards so well, and fit within the Master Layout 1 ovals.


I used the following to make the cards:

  • Gina K - Master Layout sets 1, 2 and 3
  • Gina K Ink - Christmas Pine, Red Velvet, Powder Blue
  • Gina K - Seasons Greetings Stamp patterned paper
  • Tim Holtz - Mini Doodle Greetings Stamp Set

Monday, November 16, 2020

Birthday Silhouette

 I create the background for this card first.  It took a while for me to decide what to do with it, and decided that a silhouette would be perfect.  Here is the card I made:

I used the following to make the card:
  • Distress Oxide - Squeezed Lemonade, Ripe Persimmon, Wilted Violet, Blueprint Sketch
  • Gina K - Wild Blossoms
  • Gina K - You Make Me Happy
  • Gina K - Obsidian Ink
To make the card, I used the Distress Oxide Inks to create the background.  I decided to try blending with my blender brushes, and they worked great with the Distress Oxide ink.  The ink blended so easily.
I stamped the flowers and sentiment with obsidian ink.  The entire panel was trimmed and matted with black.  The entire piece was added to the card base to complete the card.

Thursday, November 12, 2020

Vanilla Arts Nevermore Manor Halloween Cards

 I took another fun Vanilla Arts class, Nevermore Manor.  And here is my completed image:


I thought that the image would make great Halloween cards, so I scanned the image, cropped it, and lightened it (the original was too dark when printed). These were matted and added to the card bases to complete the cards.  


Tuesday, October 27, 2020

Autumn Greeting!

I like Autumn.  I like Autumn so much that I have a large collection of stamps and dies for fall that are not Halloween related.  Here is a card that I made using those supplies:


To make the card, I used the following:

  • Gina K - Foilmates - Autumn Leaves
  • Deco Foil - Amber Watercolor
  • Tim Holtz - Metallic Kraftcore Paper
  • Tim Holtz - Skeleton Leaves Dies
  • Versa Mark
  • Stampendous - Detailed Black Embossing Powder
  • Gina K - Master Layouts 1
To make the card, I foiled the Autumn Leaves paper with the Amber Watercolor foil.  This was then trimmed to size using the smaller of the Master Layouts dies.  The foiled image was matted with black card stock cut to size using the larger of the Master Layouts dies.  This was then added to card base.  The leaves were cut from the Metallic paper and added to the card.  The greeting was then stamped on a piece of the metallic paper with Versa Mark, embossing powder was added and heat set.  This was then matted with black and added to the card completing the card.

Friday, October 23, 2020

Foiled Halloween

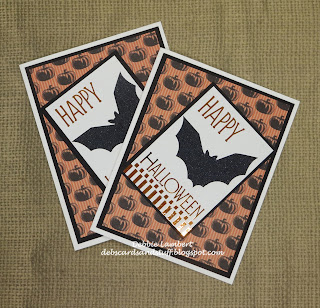
I like the look of foil on a card!  I just wish it photographed better!  A while back I picked up a pack of Halloween Bats that were foilable, and of course I needed to use them to make Halloween cards.


I used the following for the cards:

  • Creative Vision Stamps - Happy Halloween foil-able images
  • Gina K - Sweet Mango Foil
  • Unknown - Black Glitter Foil
  • Patterned Paper by Recollections
To make the cards I first foiled the image using a Minc machine,  Sweet Mango foil was used for the sentiment, and the glitter foil used for the bat.  The foiled image was then mounted on black card stock.  The pumpkin patterned paper was mounted on black, and then added to the card base.  The image was added at an angle to complete the card.

Thursday, October 15, 2020

Ghostly Halloween

Its become tradition that I make Halloween cards for the Grandkids.  For these cards, I am using my favorite Halloween sets from Mama Elephant and Lawn Fawn:


For the Purple card, I used the following:
  • Gina K - Wild Lilac Ink and Card Stock
  • Mama Elephant - Boo-tastic Stamp Set
  • Lawn Fawn - Spooktacular Stamp Set 
  • A Colorful Life - Ghosties Stencil
  • Gina K - Small Circle Dies
For the Orange card, I used the following:
  • Gina K - Sweet Mango Ink
  • Mama Elephant - Boo-tastic Stamp Set
  • Lawn Fawn - Spooktacular Stamp Set and Matching Dies
  • Copic Markers - C5, C7, C9, Y15, YR12, YR14, YR18, R01
  • Wink Of Stella Clear
  • A Colorful Life - Ghosties Stencil
  • Gina K - Small and Large Circle Dies
To make the cards I first created the background by stenciling the Ghosts. The background was then trimmed to size and matted with black card stock and added to the card base.  The sentiment was added.  The 3 ghosts were stamped and die cut.  These were added to a black circle and added to the purple card with foam squares to complete the card.  The witches hat was stamped, and then masked to add the ghost.  The hat was colored with Copic markers.  The image was cut with a small circle die, and matted with black.  This was added to the orange card with foam squares to complete the card.  

The Purple card was entered in the Simon Says Stamp Monday Challenge Spooky

Monday, August 31, 2020

Ink Splattered Happy Birthday

Here is an ink splattered Birthday card!  One of the stamps in the Gina K Tiny Textures stamp set looks like ink splatters, and I thought it would make a great Birthday card.  

I used the following for the card:

  • Gina K - Tiny Textures Stamp set
  • Gina K Ink - Red Hot, Tangerine Twist, Wild Dandelion, Lucky Clover, Turquoise Sea, Blue Raspberry, Wild Wisteria, Jet Black
  • Gina K - Master Layouts 1 die set
  • Picket Fence Studio - Happy Happy Happy Birthday stamp
  • Versamark
  • Zing Clear Embossing Powder
To make the card, I cut the layers (white and black) using the Master Layouts.  I then stamped the ink splatters on the white card stock using the Gina K inks.  The sentiment was then stamped with black ink.  Since that looked flat, it was stamped again with Versamark, clear embossing powder was added and heat set. This layer was then added to the black layer, and the entire piece added to the card base to complete the card.

Monday, August 24, 2020

Sympathy card (with Gina K stamps)

This is the card no one wants to make - a Sympathy card.  I needed one recently and the Natural Silhouettes stamp set from Gina K came in handy.  I had just received the stamps the day before and ended up using them immediately.  I based this card on a similar card to one Gina K made using these stamps and colors.

I used the following for the card:

  • Gina K - Master Layouts 1 die set
  • Gina K Ink - Kraft, Prickly Pear, Chocolate Brown
  • Gina K - Natural Silhouettes stamp set
  • Tombow Markers - 098, 837 and 346 
  • Recollections - Scripty Background
To make the card, I cut the layers using the Master Layout dies.  On the white layer, I stamped the background using the Scripty Background stamp with Kraft ink.  I used the thumping technique on the main image - inking the stamp first with Prickly Pear, then "thumping" the markers on the stamp randomly.  The sentiment is also from the Natural Silhouettes set and was stamped in Chocolate Brown ink.  The white panel was then attached to the mat and then to the card base to complete the card. 

Monday, August 17, 2020

A masked Birthday Card

Inspiration for this birthday card came from a post in the Gina K Designs & StampTV Friends Facebook group (From Marcia Hill). I was also able to use the Master Layouts dies, and these are wonderful!  


I used the following for this card:
  • Gina K - Masking Magic
  • Gina K - By the Sea 2 stamp set
  • Gina K - Black Onyx, Powder Blue, Raspberry, Plum Punch, Edible Eggplant inks
  • Gina K - Master Layouts 1
  • Hero Arts - Infinity Circle Dies
  • Altenew - Birthday Greetings
To make the card, I cut a circle from the Masking Magic to make a window. I then added mask (without the circle) to the white layer.  I then added the inks, blending them (blue into purple) with blender brushes.  I removed the mask, and stamped the images.  The white panel was added to the black panel, and the entire image added to a card base to complete the card.  

Monday, August 10, 2020

A Hamilton Birthday Card

My niece is obsessed with Hamilton.  So when Cathy Zielske provided a printable card, with the Hamilton image, I knew I needed to use it somehow for a card.  

I really wanted to use foil for the gold  background.  So, using Adobe Photoshop Elements, I reversed the colors in the image, added the happy birthday, and printed it on black paper.  I then foiled the image and added a black mat, and placed it on the card base to complete the card.


Monday, August 3, 2020

Cards made from Stamped Watercolor Classes

Back in March, I posted the images I created from the Stamped Watercolor and Stamped Watercolor Scenes classes (from Sandy Allnock).  Well, I finally got around to making all of the images into cards. I used a variety of inks, greetings and even used a bit of patterned paper to complete these cards.  Besides birthday and anniversary cards, there were a few Easter and Christmas cards in the mix.


Monday, July 20, 2020

Happy Birthday!

Here is a card I made using a stamp from Local King Rubber Stamps and a stencil from Neat and Tangled.


I used:
Local King Rubber Stamps - Rio (Stamp and Dies)
Neat and Tangled - Radiating Star Stencil
Memento - New Sprout (used with the stencil)
Various Dye Based Markers (for the bird) - mainly markers from Local King Rubber Stamps.
Altenew - Beautiful Inside (sentiment)
Gina K - Fresh Asparagus Ink


Monday, July 13, 2020

A fishy card

The perfect combination for a masculine card - Hero Arts and Kitchen Sink Stamps.  While this card says "Happy Fathers Day" just by changing the sentiment, it could be used for almost any masculine card.   The fish is a layering stamp from Kitchen Sink Stamps and it works perfect with a background stamp from Hero Arts!


I used:
Kitchen Sink Stamps - Fishing 4 mini
Hero Arts - Fishing Pattern Bold Print
Gina K - By The Sea 2 (for the sentiment)
Gina K - Large and Small Oval Dies
Gina K Ink - Black Onyx, Sandy Beach, Jelly Bean Green, Dark Sage

Monday, June 29, 2020

My version of a Cathy Zielske Card.

When I saw this card on Cathy Zielske's blog, I knew I needed to recreate it.  I like Cathy's style, and this was a card that really caught my attention.  Here is my version of the card:


To make the card, I used:

  • Various colors of Distress Ink
  • Taylored Expressions - Ray Of Sunshine die
  • Watercolor Paper
  • Recollections - Foam Squares
  • The Sentiment was from an old set.
The Distress Ink was used like a watercolor and added to the watercolor paper.  This was then cut with the die.  I made sure that the pieces stayed in the die and purple tape was added to the back to keep everything in place when it was removed from the die.  I then used Glad Press n' Seal to hold all of the pieces in place from the front, and the purple tape removed.  Foam Squares were added to all of the pieces and the entire thing was added to an A2 size card base.  The frame was then removed leaving the rays in place.  The sentiment was added to complete the card.

Sunday, June 21, 2020

Fathers Day Card with Blue Knight Rubber Stamps and Pan Pastels

I've had Pan Pastels for several years, but haven't used them all that much.  I originally got them because I has having problems getting smooth blends with ink, and thought these would work better, which they did.   But, with practice, I got better at ink blending, and I didn't use the Pan Pastels all that much.  I finally decided that it was time to use them again, and here is the card I made using the Pan Pastels:

I used the following to make the card:

  • Various colors of Pan Pastels
  • MFT Oval Extraordinaire Stencil Mask
  • Blue Knight Rubber Stamps - Small Wild Grass and Birds
  • Gina K - By The Sea 2 Stamp Set
  • Gina K - Coral Reed Ink and Card Stock


Monday, June 15, 2020

Fathers Day Cards using the Gina K Carved Wood technique

When I saw the Carved Wood technique on one of the Gina K Stamp and Chat videos, I knew I needed to try it for myself.  I also figured it would lend itself to masculine cards.

This technique involves embossing a stencil, adding the score lines (for the wood planks) and using using ink pads to create the wood grain.  The biggest problem I had with this technique was choosing which side to use for the card! Here are the front and back of the two pieces I made:


I ended up using the front for both cards I made.


I used the following to make the "Car" card:
  • Crafters Workshop - Mini Gears Stencil
  • Gina K Ink - Soft Stone, Stormy Sky, Slate, Charcoal Brown
  • Tim Holtz - Here & There Stamp Set
  • Gina K - By the Sea 2 (for the sentiment)
  • Gina K - Single Stitched Oval Dies
  • Gina K - Charcoal Brown Card Stock
  • Twine
For the second card I used:
  • TWC - Mini Climbing Vine Stencil
  • Gina K Ink - Warm Cocoa Dark Chocolate, Soft Stone and a touch of Sea Glass
  • Gina K - Vertical Greetings & Things, and By The Sea 2 Stamp Sets
  • Gina K - Charcoal Brown Card Stock


Monday, June 8, 2020

A Birthday Card for a 16 year old

I needed a card for a 16 year old, and thought what is important to a soon to be 16 year old ... the answer is getting their drivers license.

So, I searched the web for a blank template for a license plate from their state, and in Adobe Photoshop added the plate number - in this case "6 TEEN".  I then used this as a tiled background image for the card.  It was printed on heavy weight card stock at 5.25 x 4.  I matted this image and added it to a card base. 

The sentiment was cut using the Happy Birthday die from Elizabeth Craft Designs.  Card stock was added to fun foam first, then the entire piece die cut.  This gives the die cut a bit of height.

Here is the resulting card:


Supplies:
Adobe Photoshop (to create the background)
Elizabeth Craft Designs - Happy Birthday
Dark Green Card Stock (for the sentiment and the mat)
White Card Base

Friday, May 29, 2020

Foiled Birthday Card (Gina K)

When a quick, masculine card is needed and you are out of ideas, turn to foiling!  Here is the card I made for my nephew. I just wish I had made a few more while I had the supplies out!  These cards are easy to make, foil the images and assemble.  The results are spectacular!


I used the following for the card:

  • Gina K Fancy Foil - Grass Green
  • Gina K Foil-mates - Birthday Essentials, Stars & Stripes
  • Gina K - Large and Small Rectangle Dies
  • Gina K - Grass Green, and Black Paper

Monday, May 4, 2020

Anniversary Card (Gina K)

The Gina K Stamp and Chat videos are really inspiring me to make cards!  Here is another based on one of the videos.

I used the following for the card:

  • Gina K - Wild Blossoms Stamp Set, Fresh Asparagus Ink
  • Altenew - Warm Sunshine Ink
  • Marvey Le Plume Marker - Brilliant Yellow
  • Picket Fence Studios - Words To Say Happy Anniversary
To make the cards, I stamped the vine using Fresh Asparagus.  The flowers stamps were inked with the lighter yellow, the marker was tapped on it in a random pattern, and then stamped.  The sentiment added and the panel was matted with black card stock and added to the card base to complete the card.


Monday, April 27, 2020

Stenciled backgrounds (Gina K Designs)

I've watched even more of the Gina K Stamp & Chat videos, and made more cards inspired by one of the videos.  These have a stenciled background with a silhouette stamp in the foreground.  I really like how they came out!


I used the following for the cards:
  • Gina K - Watercolor Flowers Stamp Set
  • Gina K Stencil - Water Droplets
  • Picket Fence Studios Stencil - Floral Damask
  • Gina K Ink - Tangerine Twist, Red Velvet, Wild Lilac, Lucky Clover, Blue Lagoon, Black Onyx
  • Altenew Ink - Warm Sunshine 

These were easy cards to make, I applied the ink through the stencils (for the watercolor droplets stencil, I kept it horizontal, but went in a diagonal direction for the Floral Damask stencil).  The flowers were added along with the sentiment.  The panel was matted with black card stock and added to the card base to complete the card.

I used my Taylored Expressions blender brushes again.  They made it so easy!


Monday, April 20, 2020

Blended backgrounds with Gina K

I've been inspired by Gina K's recent Stamp and Chat videos.  I made these cards based on one of the videos. I even used my Taylored Expressions Blender Brushes which I've had since Christmas, but I hadn't used.  Well I did for these cards!  What a difference the brushes make!  I'll be using them for all my blending in the future!


I used the following for the cards:

  • Gina K - Wild Blossoms Stamp Set
  • Gina K Ink - Jelly Bean Green, Blue Lagoon, Black Onyx
  • Altenew Ink - Warm Sunshine
  • Picket Fence Studios - Words to Say Happy Anniversary
  • Greenhouse Society - 06-12 set (Hi)

To make these cards, I masked the area where the ink would be added.  Using the blending brushes, I added the ink. The images and sentiments were stamped, and the panel matted with black card stock and added to the card base to complete the card.


Sunday, April 12, 2020

Altenew Tulip Easter Card

I've had this stamp set for a while, and finally used it to make this Easter Card:


I used the following for the card:
  • Altenew - Tulip Stamp Set and matching Dies
  • Altenew Ink - Frayed Leaf, Forest Glade, Evergreen, Warm Sunrise, Caramel Toffee
  • Gina K Ink - Red Hot, Peach Bellini, Coral Reef, Sea Glass, Blue Lagoon, Turquoise Sea
  • The sentiment is from a very old stamp set

To make the card, I stamps the flowers and stems in a variety of colors.  These were then cut using the matching dies.  The flowers were added to a piece of white card stock which was trimmed to 3.75 x 5.  This panel was then matted with a piece of colored card stock trimmed to 4 x 5.25.  The sentiment was stamped on white card stock, and added to the panel.  The entire panned was added to the card base to complete the card.

Thursday, April 9, 2020

Easter Egg Card (Elizabeth Craft Designs and Foil)

I've had the Easter Egg dies from ECD for a while.  I finally decided to use them this year for this card:

I used the following to make the card:
  • Elizabeth Craft Designs - Easter Eggs, Outdoor Edges dies
  • Deco Foil - Rainbow
  • Toner Sheets
  • A very old Happy Easter stamp
  • Altenew - Warm Sunrise Ink

To make the card, I cut the solid egg shapes from the toner sheet, and added the foil using my Minc machine.  The detail portion of the eggs was cut from black foil paper and added to the solid ovals.  I added several layers of grass (cut from one of the Outdoor Edges dies) to a piece of white card stock (trimmed to 3.75 x 5).  The eggs were then added tucked behind one or more layers of the grass.  The sentiment was ten stamped.  The entire panel was mounted to a piece of colored card stock cut to 4 x 5.25.  This was then added to the card base to complete the card. 

Monday, April 6, 2020

A few Easter Cards

I have a variety of Easter stamps, Dies, and Stencils.  I decided to use them to make these cards:


I used the following for the cards:

  • Impression Obession - Girl with Easter Basket Die
  • Gina K - Large Circle Die
  • Vellum
  • A very old stamp for the sentiment
  • Gina K Ink - Wild Lilac, Sea Glass, Powder Blue, Peach Bellini
  • Echo Park - Easter Rabbit Stencil
  • Altenew Ink - Warm Sunrise
  • Zig Clean Color Real Brush Markers

To make the card, I place the stencil on a piece of white cardstock and using blending brushes added the different color inks.  The panel was then trimmed to 3.75 x 5 inches.  The girl was die cut from colored card stock, and the eggs die cut from white card stock.  The eggs were colored with the Zig markers.  A circle of vellum was die cut using the Circle Die.  The sentiment was stamped using a similar colored ink to the colored card stock.  The vellum circle, was added to the stenciled panel, the girl added on top of the vellum circle, and the eggs added to the basket.  The entire panel was matted using the same color cardstock as the girl.  This was then added to the crd base to complete the card. 

Monday, March 23, 2020

A 50th Birthday Card

Another family member is turning 50, so a special card was needed!  Since I like foil and glitter, I decided to mix the two, using foil papers and glitter.


To make this card, I used the following:

  • Cuttlebug Happy Birthday Embossing Folder
  • Cricut Stretch Your Imagination 
  • Sizzix Sizzlets (Numbers)
  • Tim Holtz Kraft Core - Metallic Collection (Gold, Silver), Metallic Jewels (Black)
  • Sookwang Double Sided Tape
  • Glitter Ritz Micro-fine Glitter - Pink, Sea Green, Silver, Royal Blue, Poppy Orange, Lilac

To make the card, I embossed the Black Metallic card stock with the Happy Birthday Embossing Folder.  This was then added to the Silver Metallic panel.  Sookwang tape was added to a piece of white card stock.  This was then used to cut the balloons using the image from Stretch Your Imagination.  Two sizes were cut.  (Yep, I still have a Cricut Expression, and I use the cartridges).  The protective layer was removed from the tape, the glitter added and burnished in.  The balloons were added to the black embossed panel.  Using the Gold Metallic paper, the 50's were cut using the Sizzlets.  These were added around the balloons.  The entire panel was added to a card base to complete the card.


Monday, March 16, 2020

Paint Along Watercolor Landscapes (a Sandy Allnock class)

After completing the Stamped Watercolors classes, I decided it was time to try real watercolor.  So, I signed up for the Paint Along Watercolor Landscapes class from Sandy Allnock.   I learned a lot in this class, like red dries to a pink color, and that its difficult to mix paints to get different color greens.  There are still more lessons, so I'll see if I get better with practice.

Here is what I did for the first lesson:


Monday, March 9, 2020

Stamped Watercolor Scenes (a Sandy Allnock Class)

I decided to continue working with my Art Impressions watercolor stamps, and signed up for Stamped Watercolor Scenes class with Sandy Allnock.   This was another great class!  I loved the way these scenes came out.  Now I just have to apply what I learned to make a few of my own scenes!

Here are my class images (some of these may be made into cards!)


Monday, March 2, 2020

Stamped Watercolor (Sandy Allnock Class)

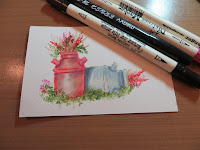
So, I've been working on classes that I have purchased.  One of these is Stamped Watercolor and its a Sandy Allnock class.  This class uses Art Impressions stamps.  The class used Tombow markers, but I decided to use what I had, which were Marvey and Distress Markers.  During this class I found that many of my distress markers were drying out!  In those cases, I just used the mini Distress Ink pads.

This was a fun class, and a great opportunity to get out my Art Impressions stamps and use them again, while learning new things!

Here's my class work (many of these will be made into cards)