Pages

Friday, December 23, 2016

Hero Arts Layering Christmas Tree

Here is a card I made with the Hero Arts Colored Layering Christmas Tree and Tim Holtz Mini Doodle Greetings.

I used the following to make the card:
  • Tim Holtz Mini Doodle Greetings
  • Hero Arts Colored Layering Christmas Tree
  • Stampendous Detail While Embossing Power
  • Versamark
  • Ranger Enamel Accents - Classic Cherry
  • Altenew ink - Frayed Leaf, Forrest Glen, Evergreen
  • Spellbinders Classic Oval Dies and Classic Scalloped Ovals
To make the card, I stamped the different layers of the Christmas tree with the Altenew Inks,  (I used these since I knew the colors would go together well).  For the final layer of the tree, I stamped with Versamark, and then added the Detail white embossing powder and heat set.  This made it look like there was snow on the branches.  The ornaments are Enamel Accents.  Once completely dry, the image was cut with the oval die.  A scalloped die was used to cut a mat for the image.  This was then added to a red card base.  The sentiment was then stamped with Versamark, white embossing powder added and heat set to complete the card.

Monday, December 19, 2016

Winter Joy Poinsettia

Here is a card made with the Poinsettia stamp from the Winter Joy Stamp set by Penny Black:


I used the following to make the card:

Kuretake Zig Clean Color - 029 Geranium Red, 024 Wine Red, 260 Deep Red, 041 Light Green 047 May Green
Perfect Pearls - Perfect Gold
PSST Sheer Shimmer - Gold
Stampendous Detail Gold Embossing Powder
Penny Black - Winter Joy Stamp Set
Unknown - Merry Christmas sentiment
Versamark

To make the card, I stamped the Poinsettia in Versamark, added the embossing powder and heat set. The image was then  water colored with the Zig Clean Color Brush Pens.  I added only a little of the color, and then used water with Perfect Pearls mixed in.  This added a lot of gold shimmer to the image.  The sentiment was stamped with Versamark, the gold embossing power added, and heat set. The entire panel was sprayed with the Psst Sheer Shimmer to add even more sparkle to the card. The image was matted with green card stock, and then added to a gold glittered card base.

Monday, December 12, 2016

Dazzles Christmas Ornaments

I think this was the easiest Christmas card I made this year!  Actually I made six of them.  I picked up the Dazzles Mix'ems Ornament Stickers several years ago, and finally decided to use them! Here is the card I made:


Since you can get six different cards made, with one set, here are all of them:


Making the card was very easy.  These stickers are like outline stickers, and there are Green, Red and White sheets in the package.  To make the ornaments, its just a matter of selecting the colors for the different elements of the ornament.  I used several ornaments on each card.  Quick and easy, and six more holiday cards were completed!

Monday, December 5, 2016

Minc Foiling and Tim Holtz

I just had to try it ... embossing a foiled image.  While I was not real happy with the result, it was OK for the style card I made.  Here is the card:


To make this card, I used the following:

  • Heidi Swapp Green, Red and Gold foil
  • Minc Machine
  • Heidi Swapp Toner Sheets
  • Tim Holtz Alterations - Tattered Poinsettia Dies and Embossing Folder


To make the card, I cut all of the Poinsettia elements out of the toner sheets.  These were then foiled using the Minc Machine and the foil.  All of the elements were the embossed using the embossing folder.  The Poinsettia was then put together using glue dots.  This added to the card base to complete the card.

Monday, November 28, 2016

Golden Christmas Tree

The Stampin' Up Lovely as a Tree stamp set is so versatile. The Pine Tree stamp can be used for a simple Christmas card.  Here is the card I made:


I used the following to make the card:

  • Stampin' Up Lovely as a Tree Stamp set
  • Hero Arts Colored Layering Christmas Tree Stamp set
  • Stampendous Detailed Gold Embossing Powder
  • Versamark
  • Simon Says Stamp Stitched Rectangles Die


To make the card, I first cut the white card stock with one of the Stitched Rectangle dies.  The image was then stamped in the center with Versmark, gold embossing powder added an heat set.  A slightly larger stitched rectangle was then cut using green card stock.  The pine tree image was added.  This was then added a gold colored card base.  At the bottom of the card (its not very visible in the picture), one of the sentiments from the Layering Christmas Tree stamp set was added using Versmark.  Gold embossing powder was added and then heat set to complete the card.

Challenges Entered: Simon Says: ‘O’ Christmas Tree Monday Challenge

Monday, November 21, 2016

75th Birthday Card

Here is is a card made for a milestone birthday (75).  It was a fairly simple card to make, using glitter and Shimmer Sheets.  Here is the card:


I used the following to make the card:

  • Elizabeth Craft Designs - Shimmer Sheets - 
  • Stazon Black Ink
  • Cricut - Happy BIrthday Embossing Folder
  • Glitter Ritz - Silver Glitter
  • Cricut - Plantin Cartridge
  • Sookwang Double Sided tape

To make the card, I embossed the Shimmer Sheet with the embossing folder.  The Stazon ink was then lightly rubbed over the embossed image.  Sookwang tape was then added to white card stock. This was then used when cutting the numbers out using the Cricut Plantin Cartridge.  The release sheet for the numbers were then removed, and the silver glitter added and burnished.  The numbers were then added to the embossed Shimmer sheet. Sookwang tape was added to the entire front of a card base.  Silver glitter was added to the edges only.  The embossed Shimmer Sheet was added to the card base to complete the card.


Monday, November 14, 2016

Christmas with Dreamweaver Christmas Borders Stencil

I'm behind on making Christmas cards.  So I got out the Dreamweavers Christmas Border stencil and made this card:


I used the following to make the card:

  • Dreamweaver Christmas Border Stencil
  • Range Dye Ink - Classic Cherry, Lily Pad
  • Memento - Brilliance Platinum Planet, Dandelion, Danube Blue
  • Ranger Texture Paste
  • Lwan Fawn Winter Scripty Sayings
  • Stampendous Rose Gold Embossing Powder
  • Versmark
To make the card, I secured the stencil to white card stock.  I then applied the texture paste, removed and cleaned the stencil.  Once the texture paste was dry, I carefully replaced the stencil.  I then added the ink to the different elements of the borders.  To give a bit of shimmer, I lightly applied the Platinum Planet ink over the entire area.  To create the sentiment, I stamped the sentiment with Versmark on vellum.  I then applied the embossing powder and heat set.  This was then cut to size and attached to the card.  The entire piece was then added to the card front to complete the card.

Monday, November 7, 2016

A Covered Bridge with Art Impressions

I just love the Art Impressions Watercolor Stamps!  The only problem I had, was that I could not stop adding elements!  Here is another card made with these stamps.


I used the following to make the card:

  • Art Impressions - Foliage Set 4051, Covered Bridge Mini Set 4808, Tree Set 4269
  • Distress Markers - Variety (I think I used most of them for this card!)
This card was simple to make!  I inked the stamps with the Distress Markers, stamped, and then using a damp brush, lightly pulled the color out from the stamped image.  I mounted the completed image to a card base, and the card was complete.  So easy and fast!

Monday, October 31, 2016

A Creepy Halloween Card

Here is the last card I made for Halloween this year.


I used the following to make this card:


  • Recollection - Halloween Phrases
  • Mama Elephant - Bootastic
  • Kuretake Gansai Watercolors
  • Versafine Black Onyx Ink
  • Zing Clear Embossing Powder
  • Simon Says Stamp Stitched Rectangles


To make the card, I created the background with the Kuretake watercolors.  I then cut the image with the Stitched Rectangle die.  The sayings were then stamped with Versafine Black Onyx Ink, and then the clear embossing powder was added and heat set.  I used some of the smaller images from the Bootastic stamp set to fill in some of the blank areas.  The entire piece was then added to a card base to complete the card.

Monday, October 24, 2016

Halloween Spider Web

Here is another Halloween card made for 2016.


I used the following to make the card:


  • Technique Junkies - Spider Web Background Stamp
  • Stampendous Detailed White Embossing Powder
  • Versamark
  • Cricut Wild Card Cartridge (Spiders)
  • Googly Eyes
  • Sigmo White Gel Pen
To make this card, I stamped the spider web with Versamark on Gray card stock.  I added the embossing powder and heat set.  This was then added to the card base.  The spiders were cut from the Wild Card Cricut cartridge and added to the card.  For the larger spider, I added some googly eyes and on the smaller spider I used my white gel pen to add the eyes.


Monday, October 17, 2016

Witchy Halloween

Here is one of the cards I made for Halloween.  Somehow its become a tradition for the Grand-kids to get a card to celebrate Halloween.

For this card I used:

  • Witch Stamp 
  • Versafine Black Onyx Ink
  • Zing Clear Embossing Powder
  • Spellbinders Circle Dies
  • Distress Ink - Black Soot, Old Paper, Pumice Stone
  • Recollections Halloween Paper
  • Recollections Halloween Sayings Stamp Set
To make the card, I stamped the witch on white card stock with the Versafine ink.  I then covered the image with the clear embossing powder and heat set.  I used a Spellbinders circle dies to cut the moon behind the witch.  I used the distress ink on the moon.  The background was made using three coordinating Halloween papers.  The witch image was then added along with the sentiment to complete the card.

Monday, October 10, 2016

Penny Black Passionate Birthday Card

I fell in love with the stamp form Penny Black.  I couldn't figure out how at first to use it, but then realized there was a very easy method - color the stamp directly!  Here is the card:


I used the following to make the card:

  • Penny Black - Passionate stamp
  • Local King Rubber Stamps Markers - Light Purple, Purple, Green, Light Green, Light Pink
  • Close To My Heart - Joyful Birthday Occasions
  • Pima - Cracked Background Stamp
  • Versafine Black Onyx Ink
  • Zing Clear Embossing Powder
To make the card, I colored the stamp with the markers, starting with the lightest colors, then adding detail with the darker colors.  I then stamped the image.  I then colored the background stamp, and stamped it over the image.  Since I used a light color marker, it didn't show through the flower.  The sentiment was then added with Versafine Black Onyx ink, embossing powder was added and heat set to complete the card.

Monday, October 3, 2016

Altenew Beautiful Day Birthday and Anniversary Cards

I just love Altenew stamps.  Especially the layering stamps.  The Beautiful Day stamp set makes beautiful cards!  Here are two that I made with this set.


I used the following to make the cards:

  • Altenew Beautiful Day stamp set
  • Altenew Ink - Leaves - Evergreen, Forest Glade, Frayed Leaf, Frosty Pink
  • Altenew Ink - Birthday Card - Coral Berry, Ruby Red, Grape Vine, 
  • Altenew Ink - Anniversary Card - Soft Lilac, Lavender Fields, Deep Iris Midnight Violet
  • Close To My Heart Celebration Stamp Set (Birthday)
  • My Favorite Things Together Forever (Anniversary)
Making the cards was easy!  I stamped the main flower, created a mask for it, then stamped the second flower.  The leaves were then added.  The sentiments were stamped to complete the cards! These took me a very short time to put together.

Here are some close-ups:


Monday, September 26, 2016

Bicycle Balloon Birthday Card

Another quick birthday card, for the bicyclist lover.


The card is 4.25 x .5.5 and I used the following to make the card:

  • Simon Says Stamp - Balloon Dies (111338)
  • Cricut Going Places - Bicycles
  • Bakers Twine
  • Pretty Pink Posh Sea Breeze Sequins


To make the card, I cut the balloon using the Balloon die from patterned paper.  The bicycles were cut from using my Cricut machine and the Going Places cartridge in various sizes.  These were then added to the balloon.  Bakers twine was added to the balloon and the balloon was added to the card base.  Sequins were added to complete the card.

Monday, September 19, 2016

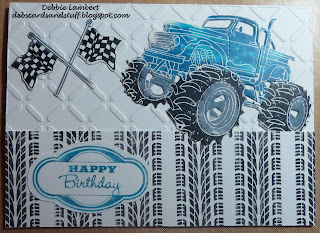
Local King Rubber Stamp - Monster Truck Birthday Card

Here is a birthday card I made for a teen that really likes Monster Trucks.


I used the following to make the card:

Local King Rubber Stamps - Rough Riders Stamps and Dies
Local King Rubber Stamps Markers - Blue, Light BLue, Black and Grey
Cricut Artiste Cartridge
CTMH Holiday Tags Stamps
Embossing Folder

To make the card, I colored the truck and flag stamps with the markers, and then stamped them.  They were cut with the matching dies.  The background for the sentiment was cut from the Cricut Artiste cartridge, and then stamped with stamps from the Holiday Tags CTMH stamp set, using the same blues as used on the truck.  I used an embossing folder on the card base.  For the bottom portion of the card base, I stamped the tire tracks on a separate piece of paper, and then attached it to the card base.  The truck, flags and sentiment were then added to complete the card.

Monday, September 12, 2016

Lawn Fawn Baked With Love Card

A co-worker make me a very nice home made lunch for my birthday this year.  This is the thank you card I made for her.


I used the following to make the card:

Lawn Fawn - Baked with Love Stamps and dies
Various Copic Markers
Distress Ink - Tea Dye
Versamark
Zing Clear Embossing Powder
My Favorite Things - Stencil Stripes
Memento Tuxedo Black Ink

To make the card, I stamped the images with Memento ink, and then colored them with Copic Markers.  The images were then cut using the dies.  For the counter top, I sponged an area using Tea Dye Distress Ink.  I stamped through the Stripes stencil with Versamark, and then added clear embossing powder and heat set.  The images were then added.  The panel was them matted and added to the card base to complete the card.

Monday, September 5, 2016

Art Impressions Watercolor Card (Memories of Stark NH)

I got more Art Impressions Watercolor stamps.  I chose 2 of the sets, because I wanted to try using the Church and the Bridge, since the two together reminded me of the Church and Covered Bridge in Stark NH.


Stark NH is a very picturesque tiny town in northern New Hampshire.  I have not been there is a while, and did this card based on my memory of what it looked like.  After I was done, I found some pictures I had taken, and I was close with my representation (google Stark NH for some really great photos of the area).


Making this card, I needed to first try to reverse the image of the church.  I had never done this before, and found that I could stamp the image on my rubber impression pad I use with my Cuttlebug, and then place the paper over the image.  This made the lines of the church slightly darker than I wanted, but I went with it anyway.

To make the card I used the following:
Art Impressions - EZ Project C (Bridge), WC Structures (Church), WC Tree Set, Foliage Set, Flower Set
Distress Markers - Old Paper, Forest Moss, Tumbled Glass, Picked Raspberry, Chipped Sapphire, Wilted Violet, Vintage Photo, Mowed Lawn, Peeled Paint, Pine Needles, Pumice Stone.

This card was entered in the Art Impressions Challenge 192 Watercolor Stamping

Monday, August 29, 2016

Another Art Impressions Watercolor card

Here is the second card I made with Art Impressions Watercolor stamps.  I have ordered additional stamps, since there is so much more I can imagine do with these stamps!


I used the following to make the card:

  • Art Impressions WC Trees, EZ Project B, Foliage Set
  • Various Distress Markers 
  • Simon Says Stamp Stitched Squares
  • Elizabeth Craft Designs Peel-off Stickers (Happy Birthday  #390)

Monday, August 22, 2016

More glitter and lace cards

Recently my granddaughter was visiting.  She mentioned that she was not that creative (but she is, she's a dancer) and didn't think she could make a card.  So I thought of the technique I used recently to make a card with glitter.  Its a easy technique,  I made a card with her, showing each of the steps. I Here are the cards we made:

My card:


Granddaughters card (I really like how she offset the square and the text):


We used the following to make the cards:
My card:
  • Glitter Ritz - Merlot and Silver
  • Stampendous Detail Silver Embossing Powder
  • Spellbinders Circle Dies
  • Lace
  • Sookwang Tape
  • Words for Sayings stamp set

Granddaughters card:
  • Glitter Ritz - Java Bean
  • The Stamp Doctor - Copper Glitter
  • Stampendous Rose Gold Embossing Powder
  • Spellbinders Square Dies
  • Sookwang Tape
  • Greenhouse Society Anemones Stamp Set

To make the card, we covered a 4.25 x 5.5 piece of white card stock with the double sided tape.  After peeling off the release sheet, lace was added on top and carefully pressed down onto the tape.  The glitter was added and burnished in.  The lace removed and the other glitter added and burnished in. We then cut an opening from the glittered card stock, and added the glittered card stock to the front of a top fold card base.  The sentiment was stamped inside the opening with Versamark and the  Embossing powder added and heat set to complete the card.


Monday, August 15, 2016

My First Art Impressions Watercolor

I really like the Art Impressions Watercolor stamps.  Using these stamps you really get a watercolor look with the stamps. I originally purchased a few sets, but now I want them all!   Here is the first card I made with the stamps I had:


I used the following to make the card:
  • Art Impressions WC Series 7 Set 2 stamps, Foliage Set and Flower Set
  • Distress Markers Mowed Lawn, Tumbled Glass, Wilted Violet, Picked Raspberry, Spiced Marmalade, Cracked Pistachio, Vintage Photo
  • Simon Says Stamp Stitched Rectangles
  • Lawn Fawn Polka in the Meadow

This card was entered in the Simon Says Stamp Monday Challenge: Summer Fun

Monday, August 8, 2016

Fathers Day Cards

Fathers day snuck up on me this year, and I needed to make some quick cards!  I decided to use a technique I previously used, and based on one I saw on a Jennifer McGuire blog post.  You can see my original cards here.  Unfortunately, I mailed most before I took a picture.


To make the card I used:

  • Distress Ink - Tumbled Glass, Broken China Peacock Feathers
  • Perfect Pearls - Perfect Pearl
  • We are Memory Keepers Next Level Embossing Folders - Geometric
  • CTMH Framed Stamp of the Month Stamp set
  • Versfine Black Onyx Ink
  • Zing Clear Embossing Powder

To make the card:
  1. Mask the edges of 4.25  x 5.5 of white card stock (I used Neenah Solar White 80lb).  
  2. In the center area, starting with the lightest color, I sponged on the distress ink, then added the darker color blending well.
  3. Perfect pearls was then added on top of the distress ink.
  4. The masking tape was removed, and the card stock trimmed slightly.
  5. I then stamped the sentiment with the Black Versfine ink in the center of the distress ink area. Clear embossing powder was added and heat set.
  6. The piece was then embossed using the embossing folder and added to the card base

Monday, August 1, 2016

Another card with Glitter and Lace

For this card, I used the same lace as in my previous card, but changed the colors.  I think for the technique to work, there needs to be a bigger difference in the colors, but my husband thought it looked good, so I made a card with it.


The card is 4.25 x 5.5 and I used the following to make the card:

  • Glitter Ritz Glitter - Java Bean
  • Elizabeth Craft Designs Silk Microfine Glitter - Bright Cranberry (657)
  • Sookwang Double sided tape
  • Lace
  • Elizabeth Craft Designs Happy Birthday Die (1054)
  • Recollections Foil Paper

To make the card, I covered a 4.25 x 5.5 piece of white card stock with the double sided tape.  After peeling off the release sheet, lace was added on top and carefully pressed down onto the tape.  The Java Bean glitter was added and burnished in.  The lace removed and the Bright Cranberry glitter added and burnished in.  I then cut a circle the Happy Birthday with the dies and the foil paper and added it to the card.

Monday, July 25, 2016

Local King Rubber Stamp Lighthouse Birthday Card

This is my husbands birthday card.  For this card, I used multiple stamp sets, but the main image is from Local King Rubber Stamp.


For this card I used:
Memento Ink - Tuxedo Black, Danube Blue, Teal Zeal, Summer Sky
Lawn Fawndementals - Mermaid
Copic Markers - G28, R59, R37, 100, C1, C3, C5, E09, E31, E35, E37, E70
Local King Rubber Stamp - Seascapes stamps and Dies
Gina K - By the Sea 2 Stamp set
Seaside Stampin' Ink - Beach Stories Stamp set and Cloud stamp
Happy Birthday Peel-off Sticker

To make the card, I stamped the lighthouse image with Tuxedo Black ink, and colored it with the Copic Markers.  The image was then cut with the die.  On a piece of 4.25 x 5.5 white card stock, the water was stamped with the water stamp from Beach Stories and a combination of Danube Blue, Teal Zeal and Mermaid inks.  The sky was stamped with the Cloud stamp and Summer Sky ink.  The die cut image was then added.  The birds were stamped with Tuxedo Black ink and the birds from By the Sea 2.  The Happy Birthday sticker was added to complete the card.


Monday, July 18, 2016

Glitter Lace Technique

Here is a card I made using glitter and lace.  I saw this technique on an Elizabeth Craft Designs YouTube video.   I love the look of the final card!


The card is 4.25 x 5.5 and I used the following to make the card:

  • Glitter Ritz Champagne and Warn Highlight
  • Sookwang Double sided tape
  • CTMH Joyful Birthday Occasions Stamp Set
  • Versmark
  • Lace
  • Stampendous Detailed Gold Embossing Powder
  • Spellbinders Standard Circles Dies
To make the card, I covered a 4.25 x 5.5 piece of white card stock with the double sided tape.  After peeling off the release sheet, lace was added on top and carefully pressed down onto the tape.  The Champagne glitter was added and burnished in.  The lace removed and the Warm Highlight glitter added and burnished in.  I then cut a circle from the glittered card stock, and added the glittered card stock to the front of a top fold card base.  The sentiment was stamped inside the circle with Versamark and the Gold Embossing powder added and heat set to complete the card.

Monday, May 23, 2016

Faux Hand Painting

Well, its Day 7 of the Watercolor for Card Makers (at Online Card ClassesFaux Hand Painting. I find myself really stretching myself.  I'm also finding it harder to find stamps that will work with some of these techniques!  (It may be time to order some more stamps!)

So far, I have only completed one of the techniques for Day 7.  Here is the card that I made using one of the Faux Hand Painting Techniques:


I used the following to make the card:

  • Close to My Heart Floral Happiness Stamp Set
  • Distress Ink: Worn Lipstick, Bard Door, Fired Brick, Crushed Olive, Forest Moss
  • Memento Ink Angel Pink
  • Versamark
  • Stampendous Detailed Gold Embossing Powder
  • Close to My Heart Framed Stamp of the Month Stamp Set

Monday, May 16, 2016

Water coloring Stamped Images (Day2)

Day 6 of the Watercolor for Card Makers (at Online Card Classeswas water coloring Stamped images. 

Here are my versions of the cards from Day 6 of the class.  I won't go into specific of how the cards were made (for this you should take the class), but will provide the supplies I used. Here are the 3 cards I made using the techniques from the class.

Card 1:
 Card 2:
 Card 3:

For Card 1 (One of my favorites!) I used the following:

  • Versafine Black Onyx Ink
  • Zing Clear Embossing Powder
  • Penny Black Blooming Garden Stamp Set
  • Distress Ink: Wild Honey, Tumbled Glass, Squeezed Lemonade, Dried Marigold, Worn Lipstick, Mowed Lawn
  • Close to My Heart A Little Note Occasions Stamp Set
  • Spellbinders Square Dies

For Card 2 I used the following:

  • Simon Says Birthday Celebration
  • Versafine Black Onyx Ink
  • Kuretake Water Colors: 10, 20, 34, 63, 54, 58, 139, 43
  • Close to My Heart Joyful Birthday Occasions Stamp Set
For Card 3, (this one has a lot of sparkle and shine, since I used perfect pearls in the water used), I used the following:
  • WPlus9 Flora & Fauna 2 Stamp Set
  • Versmark
  • Stampendous Detailed White Embossing Powder
  • Distress Ink: Weathered Wood, Shaded Lilac, Squeezed Lemonade, Spiced Marmalade, Candied Apple, Salty Ocean
  • Perfect Pearls
  • Close to My Heart Just to Say Stamp Set

Monday, May 9, 2016

Bird Crazy Anniversary Card

Here is a card I made for my husband for our Anniversary.  Unlike most of my cards, this on is 5.25 x 6.5.  I needed the extra space for both birds.


I used the following to make the card:

  • Tim Holtz Bird Crazy Stamps and Dies
  • Tim Holtz Crazy Things Stamps and Dies
  • Copic Markers:  E50, E53, E57, E59, Y11, Y13, Y15, YR16, YR18, YG63, R20, R21, R24, R29, R59, R81, R83, R85, B0000, B95, B97, C3, C5
  • Memento Tuxedo Black Ink
  • Lawn Fawndementials Mermaid
  • Seaside Stampin' Ink Cloud Stamp
  • Distress Ink - Lowed Lawn
  • Lawn Fawn Scripty Sayings Stamp Set
  • Taylored Expressions Many Mini Occasions Stamp Set


To make the card, I stamped the birds with Memento Tuxedo Black Ink,  I also stamped the accessories that I would be using.  The birds and the accessories were then colored with the various Copic Markers.  I then cut out the birds and accessories using the dies.

The grass on the card base was colored with Mowed Lawn, and the sky was stamped with a Cloud stamp and Mermaid ink.  The Birds and accessories were added, a bit of shadow added under the birds, and the the sentiments added to complete the card.

Monday, April 25, 2016

Penny Black Blooming Garden

For this card, I decided to try some water color stamping.  This is one of my favorite techniques to use with distress markers,  The finished card is 4.25 x 5.5


I used the following to make the card:

  • Distress Markers: Fossilized Amber, Barn Door, Candied Apple, Aged Mahogany, Pine Needles, Mowed Lawn
  • Close to My Heart Holiday Tags Stamp Set
  • Penny Black Blooming Garden Stamp Set
  • Lawn Fawndamentals Freshly Cut Grass
To make the card, I colored the stamp with the distress markers, and lightly spritzed with water.  I then immediately stamped it on watercolor paper.  The sentiment was stamped with Freshly Cut Grass.  I then cut the watercolor panel to 3.25 x 5.5.  This was added to a panel of rose card stock cut at 3.75 x 5.5,  Ribbon was added and then the entire piece added to the card base to complete the card,

Monday, April 18, 2016

Water Coloring Stamped Images

Day 5 of the Watercolor for Card Makers (at Online Card Classeswas water coloring Stamped images. I had a lot of trouble with one of the techniques, and after several tries, I gave up.  I figure once I am more comfortable with water coloring, I'll go back an try it again.

Here are my versions of the cards from Day 5 of the class.  I won't go into specific of how the cards were made (for this you should take the class), but will provide the supplies I used. Here are the 2 cards I made using the techniques from the class.

Card 1:


Card 2:

For the first card, I used: 
  • Penny Black All Over Pattern Stamp
  • Distress Markers: Mowed Lawn, Mustard Seed, Spiced Marmalade, Ripe Persimmon, Peacock Feathers
  • Lawn Fawndanmentals: Wild Rose
  • Versamark
  • Stampendous Detailed White Embossing Powder
  • WPlus9 Hand Lettered Thanks Stamp set
  • Simon Says Stamp Stitched Rectangles
For the second card, I used:
  • Kuretake watercolors #52, #61 (for the background)
  • Prismacolor Watercolor Pencils
  • Stampendous Wishing Well Stamp
  • Mama Elephant - Make a Wish stamp set
  • Versfine Black Onyx Ink

Monday, April 11, 2016

Watercolor Stamping (Day 2)

Day 4 of the Watercolor for Card Makers (at Online Card Classeswas more watercolor stamping. I'm still trying each technique, and making cards from each.

Here are my versions of the cards from Day 4 of the class.  I won't go into specific of how the cards were made (for this you should take the class), but will provide the supplies I used. Here are the 3 cards I made using the techniques from the class.

Card 1:


Card 2:

Cards 3 and 4:


For Card 1, I used the following:
  • Distress Ink: Shaded Lilac, Salty Ocean, Lucky Clover, Squeezed Lemonade
  • Versafine Black Onyx Ink
  • Lawn Fawn Eggstra Special Easter Stamp Set

For Card 2, I used the following:

  • Memento Ink: Danube Blue
  • Close to My Heart Joyful Birthday Occasions
  • Distress Ink: Blueprint Sketch, Wilted Violet, Peacock Feathers, Cracked Pistachio
  • Pretty Pink Posh Sugar Plum Mix Sequins


For Cards 3 and 4 (Card 3 was first generation stamping, and Card 4 second generation stamping), I used the following:

  • Ivy Branch Stamp (Unknown Manufacturer)
  • Distress Ink: Fossilized Amber, Barn Door, Candied Apple, Aged Mahogany, Pine Needles, Mowed Lawn
  • Close to My Heart Holiday Tags Stamp Set
  • Lawn Fawndamentals Freshly Cut Grass Ink

Monday, April 4, 2016

Watercolor Stamping

Day 3 of the Watercolor for Card Makers (at Online Card Classeswas about watercolor stamping. I'm still trying each technique.

Here are my versions of the cards from Day 3 of the class.  I won't go into specific of how the cards were made (for this you should take the class), but will provide the supplies I used. Here are the 3 cards I made using the techniques from the class.

Card 1:


Card 2:


Card 3: 


For the first card, I used the following:

  • Altenew Vintage Flowers
  • Thank-you Stamp
  • Memento Inks: Tangelo, Dandelion, Rosebud, Angel Pink, Bamboo Leaves, New Sprout, Sweet Plum, Lulu Lavender
  • Spellbinders Classic Ovals

For the second card, I used the following:

  • Gina K Spring Basket Stamp Set
  • Distress Markers: Worn Lipstick, Fired Brick, Vintage Photo, Candied Apple, Pumice Stone, Peeled Paint, Mowed Lawn
  • Close To My Heart Framed Stamp of the Month Stamp Set
For the third card, I used the following:
  • Kuretake Watercolor #64
  • Distress Markers: Hickory Smoke, Weathered Wood, Fired Brick, Carved Pumpkin, Gathered Twigs, Black Soot, 
  • Texture Paste
  • Memory Box Winter Tiny Wishes Stencil (although you can't see it in the picture, there are embossed snowflakes on the card as well)
  • Gina K Snowman Wishes Stamp Set

Monday, March 21, 2016

Watercolor Cards (Day 2)

Day 2 of the 'Watercolor for Card Makers' class (at Online Card Classes) was more watercolor backgrounds.  Since I am trying each of the techniques, I am glad I didn't take this class as an interactive class - I would never have been able to keep up!

Here are my versions of the cards from Day 2 of the class.  I won't go into specific of how the cards were made (for this you should take the class), but will provide the supplies I used.

Card 1:


Card 2 (I think this is my favorite so far):

Card 3: 

For the first card, I used:

  • Prismacolor Watercolor Pencils: WC2917 Sunburst Yellow, WC2906 Copenhagen, WC2909 Grass Green, Black
  • Kuretake Watercolor: #50
  • Spellbinders Circle Dies
  • Kreinik Gold Metallic Thread
  • Gold Sequins
For the second card, I used:

  • Kuretake Watercolors: #32, #33, #43
  • Technique Tuesday Greenhouse Society Rose
  • Versafine Black Onyx Ink
  • Miskit Friskit 
  • Mother's Day stamp

For the third card, I used:

  • Kuretake Watercolors: #50, #51, #64, #139
  • Darice Music Background stamp
  • Zing Clear Embossing Powder
  • Versamark
  • Close to My Heart Framed Stamp of the Month
  • Memento Tuxedo Black Ink 


Monday, March 14, 2016

Watercolor cards (Day 1)

I finally decided that I needed to learn more about how to use watercolors when making cards.  I signed up for a class at Online Card Classes.  The class I chose was 'Watercolor for Card Makers'. The class is an independent class.  I decided that I would do each of the techniques, and finish the cards in a similar manner to what was shown.  This would provide me the opportunity to try many different watercolor techniques, and would push me to make cards in a style that is not what I would normally do.

Here are my versions of the cards from Day 1 of the class.  I won't go into specific of how the cards were made (for this you should take the class), but will provide the supplies I used.  Day 1 classes were about watercolor backgrounds.

Card 1:

Card 2:

Card 3:

For the first card I used:
  • Kuretake watercolors: #139, #64
  • Tim Holtz Stencil: Latticework THS019
  • Close to My Heart Joyful Birthday Occasions
  • Memento Lulu Lavendar
  • Ribbon
For the second card I used:
  • Distress Ink: Picked Raspberry, Spiced Marmalade, Mustard Seed, Peacock Feathers
  • Simon Says Birthday Celebration Stamp Set
  • Versamark
  • Stampendous Detail White Embossing Powder (if I were to make this card again, I would chose a darker color embossing folder)
For the third card I used:
  • Kuretake Watercolors: #43, #30, #139, #64
  • Zing Clear Embossing Powder
  • Penny Black Allover Pattern background stamp
  • Versamark
  • Mama Elephant Hand Lettered Thanks stamp set
  • Pretty Pink Posh Sugar Plum Sequins